In the first part of this article, we analysed the key concepts of version control using the Git tool, from the basics of how it works to the basic operations and elements that allow us to efficiently manage the source code of our projects. In this second part, we are going to put into practice all the theory we saw in the first part.
Through a concrete example, we will perform the essential Git tasks by replicating a real workflow. First, the creation of a repository, branch management and collaboration with other users. We will also replicate conflict resolution and version history checking. For this, we will use as support Azure DevOps services that will facilitate the management of the GIT repository as well as implementing other elements of the DevOps methodology.
The following tools will be used to develop this demonstration:
- IDE: Visual Studio 2022
- Service for version control: Azure DevOps
In any case, it is possible to work on any development environment (IDE) that allows working with GIT or from the command console itself. It is also possible to host the remote repository using other services such as GitHub, GitLab, etc.
Create a repository
The remote repository will be created in Azure DevOps to clone it later In our development environment and work on the repository locally. To do this, we must access Azure DevOps and, within a Project, create a new repository.
We can have several repositories in the same Azure DevOps project. If it is the first time we create a project, it will force us to create at least one repository. In this case, we will create a repository in the “AXZ Lucía” Project apart from the existing ones.
We indicate the name of the repository and confirm the creation with the “Create” button. As it is indicated in the message, the repository will be started by default with the main branch called “main”.
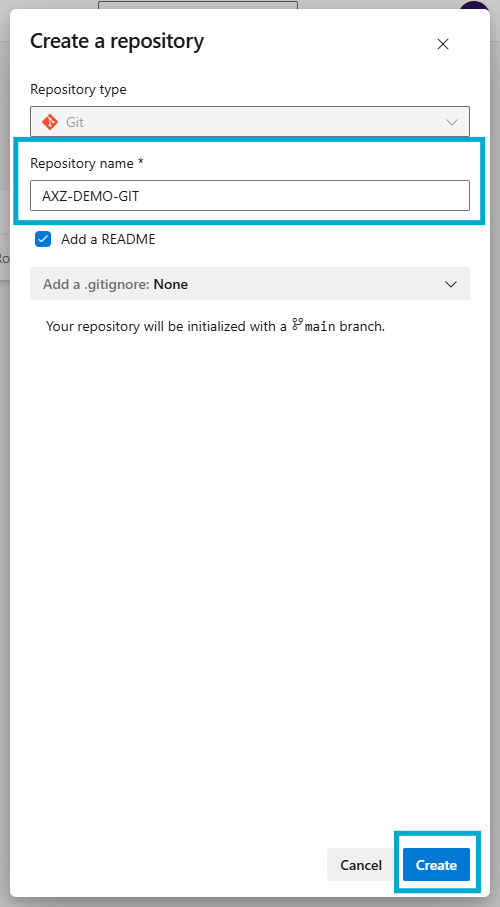
These would be the steps required to create a GIT repository hosted in Azure DevOps. It will also create a README.md file which is typically used to describe the details of the solution and the instructions needed to work with the code.
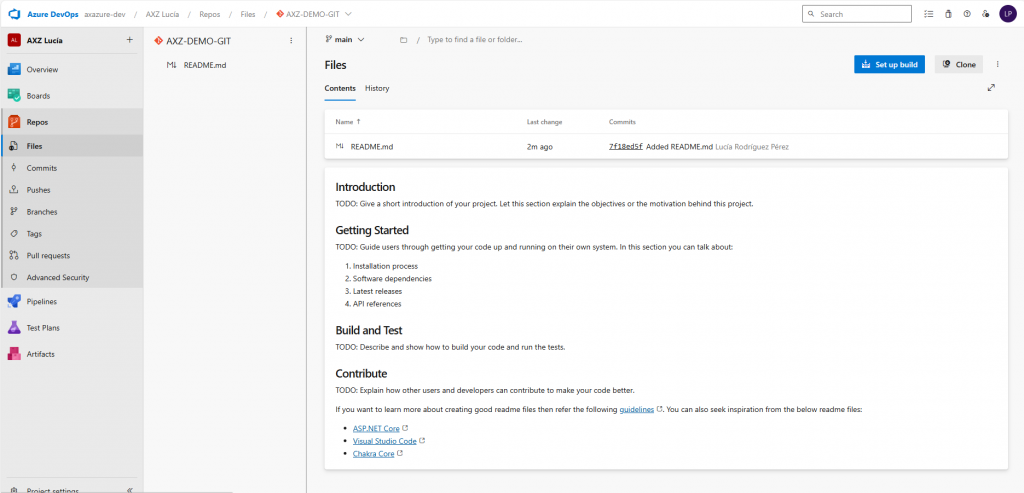
Clone the repository to work locally
Once we have created the repository, the next step is to clone or connect it to our local machine to start working in the development environment. In this case, we will use Visual Studio 2022, which has native Git integration, facilitating version control management directly from the IDE. Visual Studio will allow us to perform GIT operations without leaving the development environment, which optimizes the workflow.
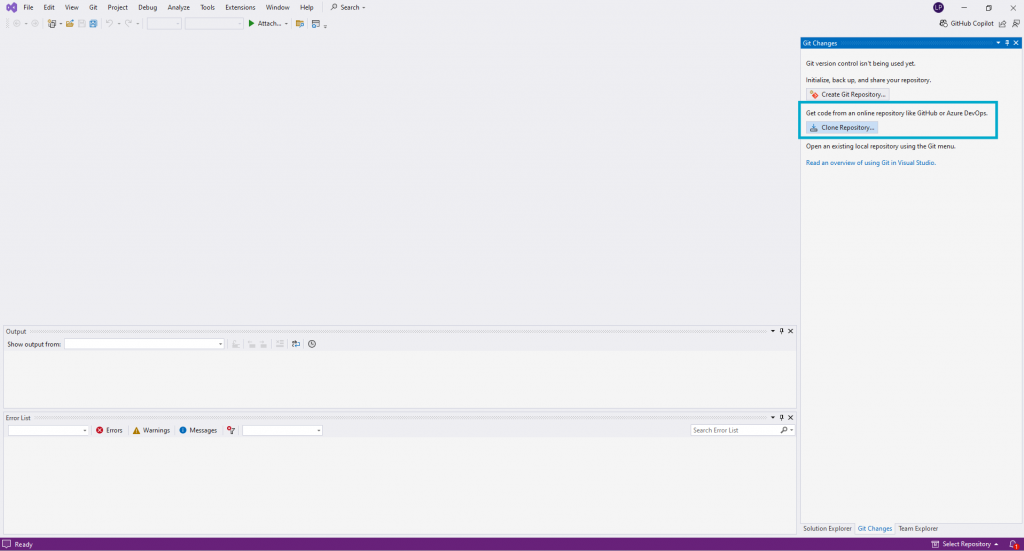
To clone the repository, we open Visual Studio and from the “Git Changes” view we click on clone repository. Then, a window will be opened where we must copy the URL of the repository that we have created in Azure DevOps.
To get this URL, we go back to Azure DevOps and click on the “Clone” button which will open a window where we can copy the URL of the repository to paste it in Visual Studio.

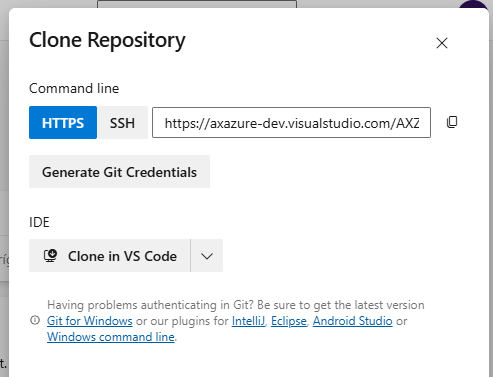
We should paste this address in Visual Studio and indicate the Local folder where we will save the repository.
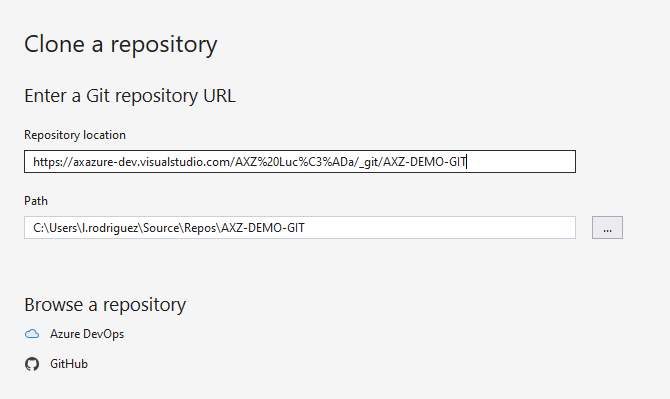
With this process, we will have created the repository in the local work environment where we are going to make the changes in the source code. This will allow us to work on the project locally, keep track of the changes and maintain traceability in the remote repository with the new versions that we will generate.
Branch management
Following the Git lifecycle recommendations, we are going to create different working branches from the main branch “main”. For this example, we are going to create a branch that will be called “develop” and it will be used as a destination branch for the different developments included in the project. In “main” branch we will have the code that has been validated and tested. If we were working in different environments, we would say that the “main” branch contains the Production code and the “develop” branch contains the Pre-Production or Testing code.
The “main” and “develop” branches will be maintained throughout the life cycle of the project. Then, we will create a temporary branch for each task/evolution/correction we perform in the source code. These branches will start and end with the development to which they are linked, that is, we will delete them when we merge them with the “develop” branch.
To create the “develop” branch, in the toolbar we will open the git branch management from Git > Manage Branches.
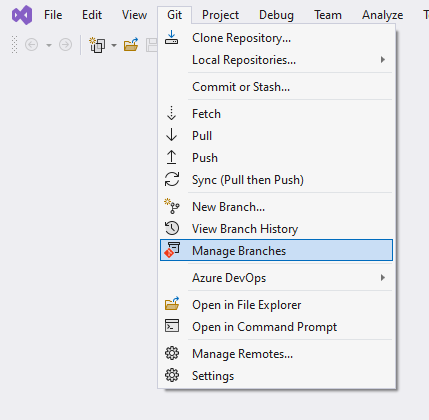
From here, we will right click on the “main” branch and click “New Local Branch From…”. This will allow us to create a local branch based on the branch “main”, that is to say, with the same code that is in “main”.
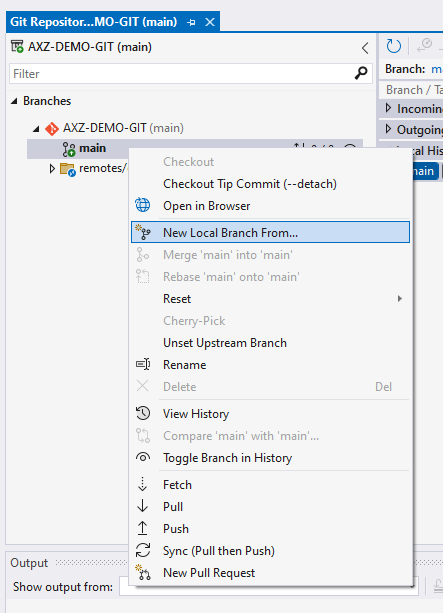
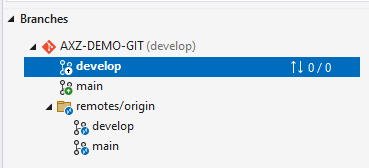
Now we can see the new local branch “develop”. For now, this branch only exists in the Local repository of the computer where we have created it, to make it part of the remote repository and other collaborators can access it, we must publish it. This is done with the “Push” action by right clicking on the branch.
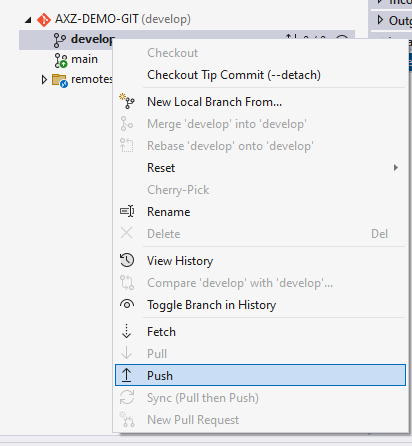
Now, the two branches are available in both the Local and Remote repositories. It is important to analyze and understand how local and remote branches work. In order to work with the code from a remote branch, a local branch with the same name will be automatically created when we pull down the changes from the branch using the “Pull” or “Fetch” operations. In the same way, in order to publish the changes of a local branch remotely, we have to use the “Push” operation. This operation can behave in two ways:
If there is a remote branch with the same name as the local branch, the changes will be published on that branch.
If there is no remote branch with that name, a new branch will be created where the changes of the local branch will be published.
As we have discussed in the creation of branches, when we code a development, Git best practices recommend creating a branch for that task and when we finish, merge it with the source branch through a Pull Request.
In this case, we are going to create a task in DevOps to simulate a real situation. Then, we will create a branch based on the “develop” branch and on this branch, we will do the task.

We follow the same steps as we have done in the previous point and create a local branch for the task with the name “AXZ_5259_DemoGit”. When we have created it, we position ourselves on this branch (checkout) and we can start working.
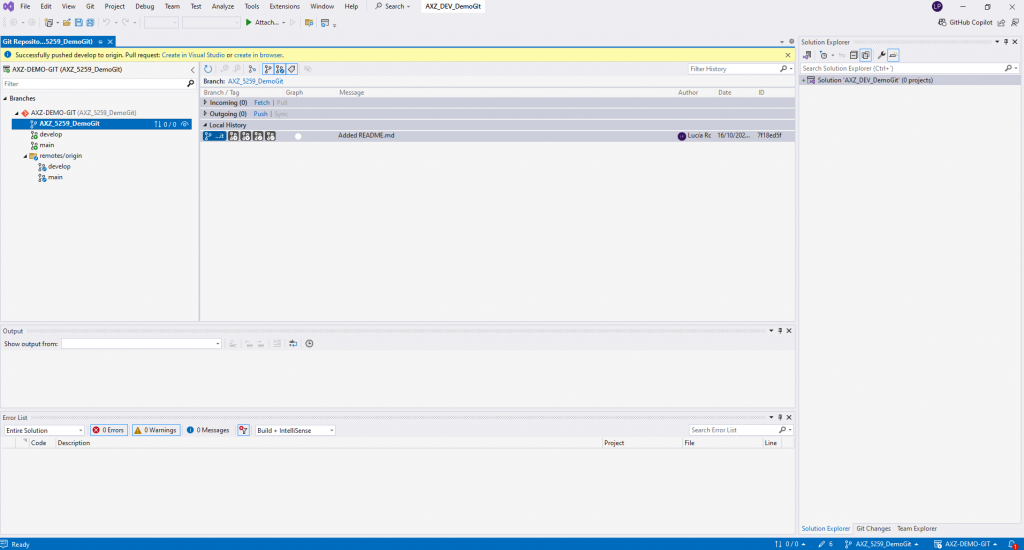
To make sure we are in the correct branch, in the branch manager we will see the branch we are working on highlighted in bold: AXZ_DEV_DemoGit and in the lower right part of the window, we can also see the branch and move to other branches.
When we finish the development, we will commit the changes to the local branch. From the “Git Changes” window we can see the files we have created, edited or deleted and we must add them to “Staged Changes” to be included in the commit. We can add a descriptive message for these changes and then commit them.
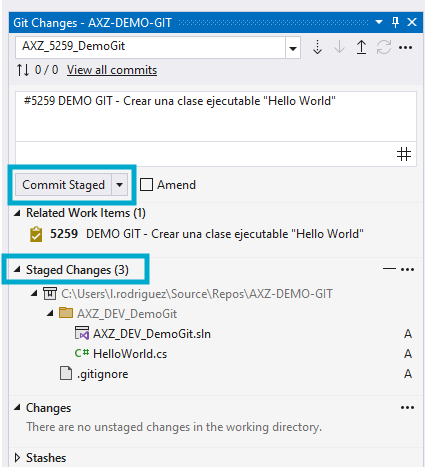
It is a good practice to try to make several commits of the code throughout the development, especially for complex developments where many lines and objects are modified or added. When we commit, these changes are committed to the local repository. For the changes to be reflected in the remote repository, we have to “Push” the branch.
From Visual Studio, it is very easy to see if we have committed changes in Local that are not in Remote and vice versa. From the branch management to the right of each branch name, there are two numbers. The one on the left indicates the number of commits in the local branch that are not in the remote branch. The one on the right is the opposite. The ideal situation is that these numbers are always 0, to be aligned with the remote repository and avoid code conflicts by not having the updated version of the repository when we work on it.
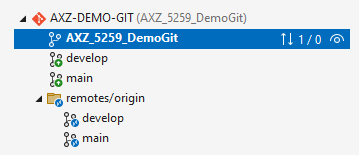
In this image we can see that we have a pending commit locally that we have to pass to the remote repository with a “Push”.
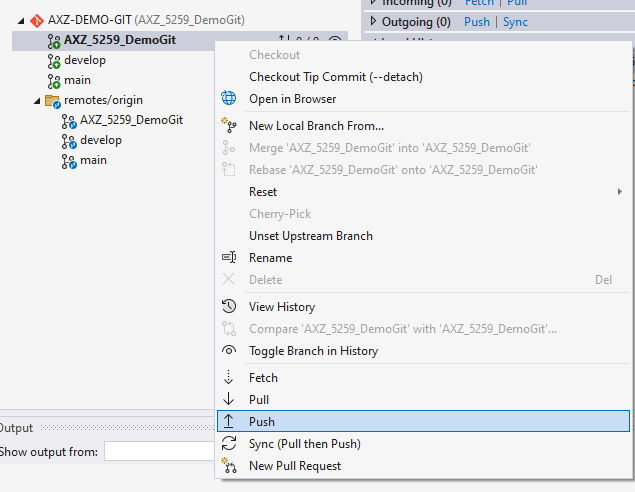
In this example, we only have one “Commit” for the development because it was a simple requirement, but it would be the same process if we had more commits. We can also leave the commits in the local branch and not send them to the remote branch until we finish all the modifications, but it is not entirely safe because this code would be vulnerable to the loss of the files on the device where the local repository is stored and, in addition, it would not allow other contributors to see these changes.
As we have finished the development, it is time to merge this branch with the “develop” branch, from which we started at the beginning of the task. To do this we need to make a Pull Request. This can be done from Visual Studio or from Azure DevOps. In this demo we will do it from Azure DevOps, since it is more intuitive and allows more customizations, but from Visual Studio it could be done from here:
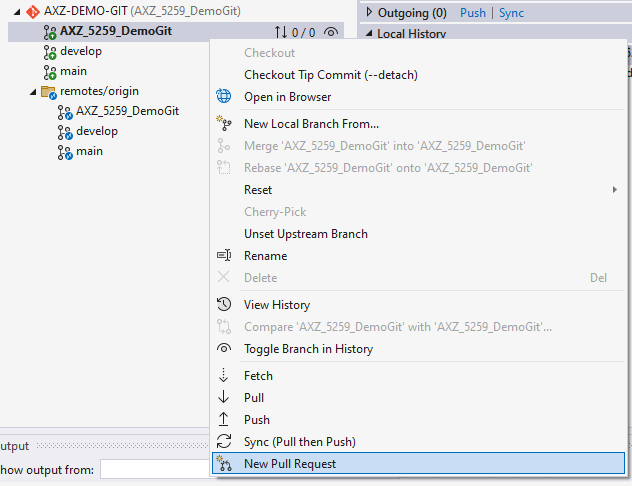
Then, we select the branch we want to merge with, validate the changes and confirm the Pull Request.
From Azure DevOps, the process is similar. Go to Repos > Pull Requests > New Pull Request menu.
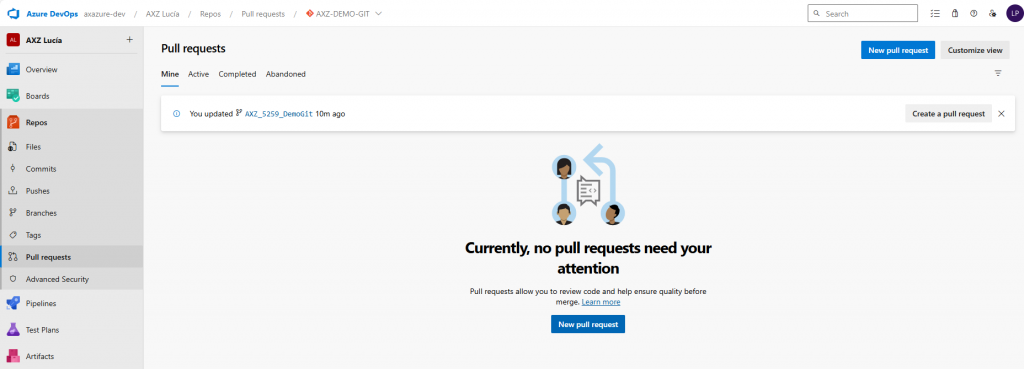
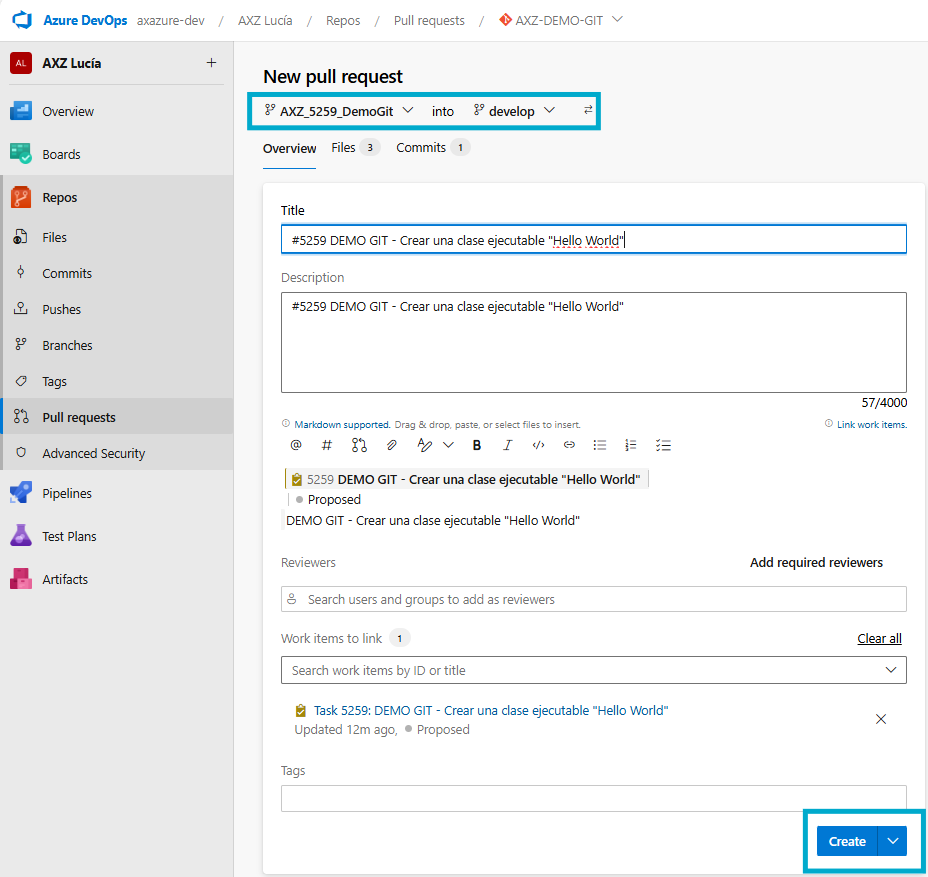
In this case, Azure DevOps autocompletes some fields such as the linked task or the title of the Pull Request. All this can be modified but they are facilities that Azure DevOps gives us depending on the tasks that we have linked to the commits of the branch we are merging. Once we have checked the files and changes that we are going to merge, we create the Pull Request.
If there is no conflict in merge and the branch does not have any “Policy” configured such as requiring a review from another user or linking a task, we can complete the merge operation.
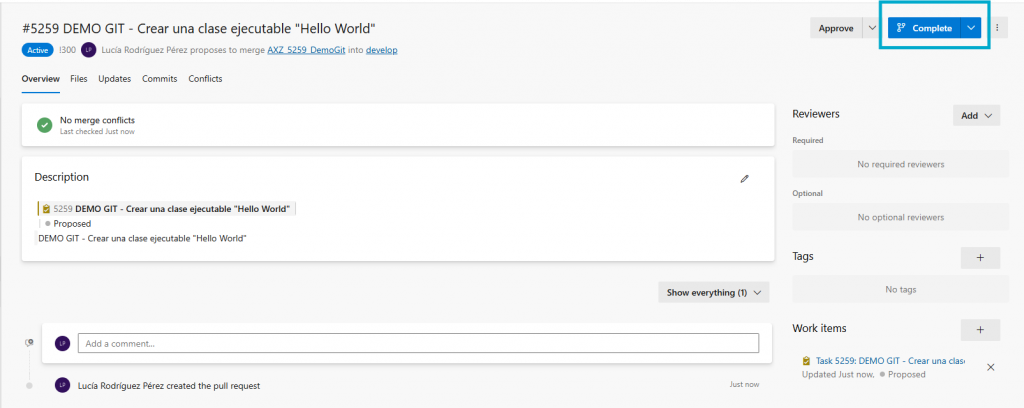
When we complete the Pull Request, we can delete the source branch or keep it. The recommendation is to delete it, since the task has been completed by merging the development with the main branch. If there are modifications to be made to the code, we will create a new branch. This always depends on the work methodology of the development team or the specific project, sometimes the branch management is different from the one recommended by Git.
Reality is not so perfect… Rollback and conflicts
Sometimes, code management is not as simple as what we have seen in the previous steps. We may encounter situations where we have to undo our changes because they cause an error in the code and it may also happen that we modify the same file as another contributor and Git is not able to merge automatically because the affected lines match, for example.
In these cases, Git offers different solutions. Let’s start by undoing the changes we have committed. As we saw in Part 1 of this article, we can rollback our code with two operations: “Revert” and “Reset”.
As a reminder, “Revert” makes a new commit where the files are modified to leave them in the same state as they were before, keeping the traceability of the changes that have been undone. “Reset”, removes the commit and the files are left in the form of the previous commit that we have undone. In this way, we lose the traceability of the changes, it is more advisable to do “Revert”.
These two operations can be done from Visual Studio. From the Branches management, in the branch where we want to undo a change, we look for the “commit” we want to revert and execute one of these operations.
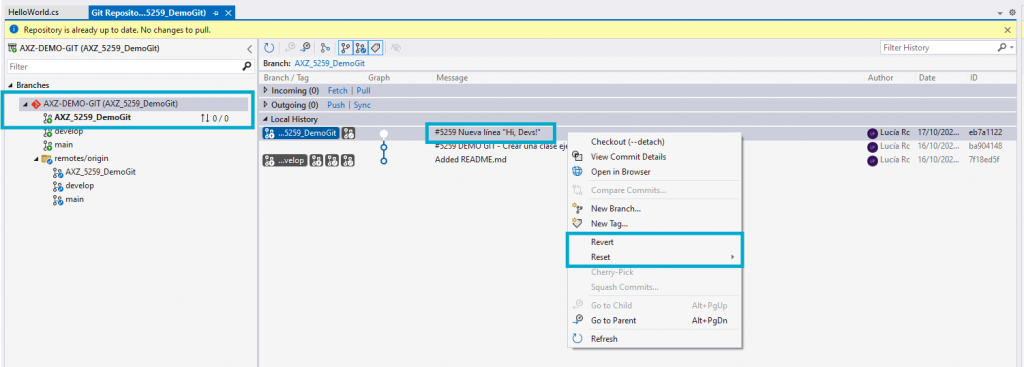
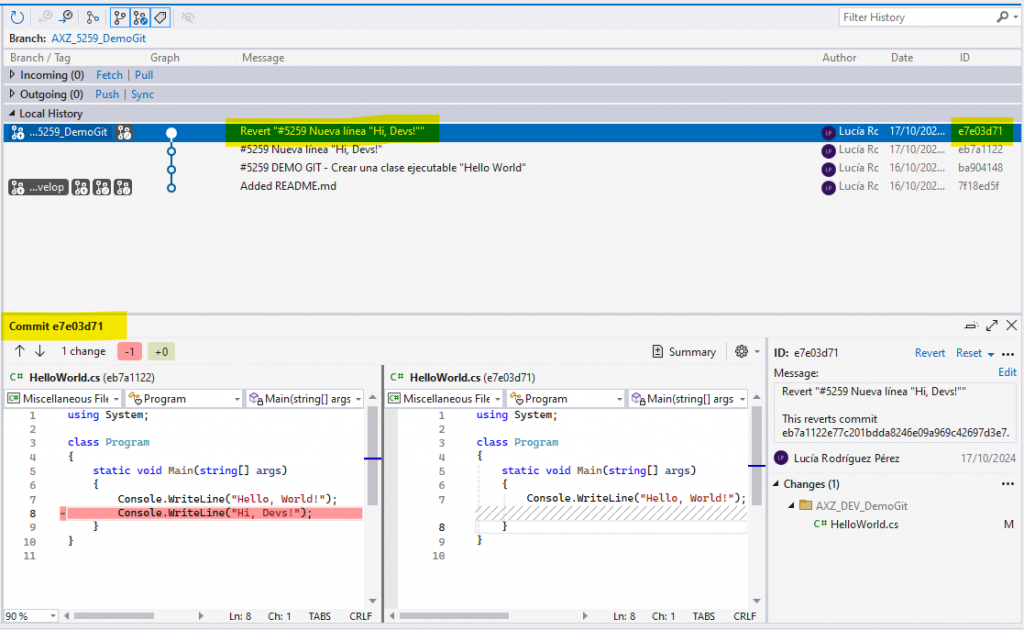
This operation creates a new “Commit” that undoes the changes. If we click on it, we can see the details of the changes.
To do a “Reset” operation we must also go to the branch management. In this case, we choose the point of the code to which we want to return, this will delete all subsequent commits (less recommended option).
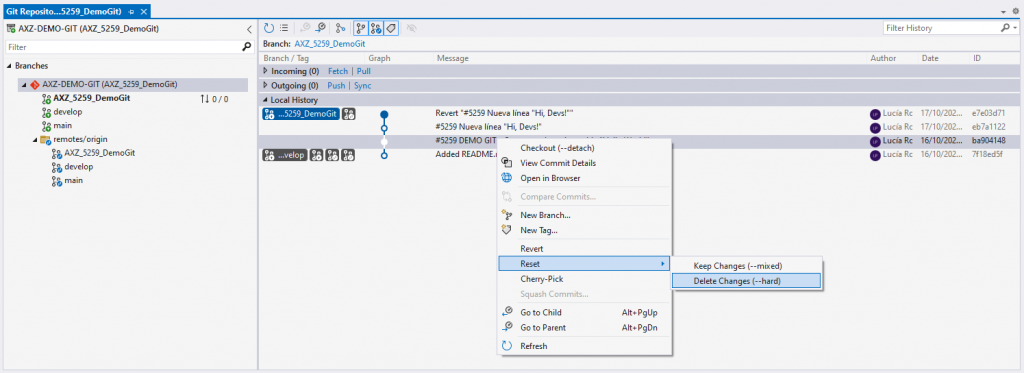
- This operation deletes all subsequent changes and the history of changes.

The other problem that we can have when working in a remote repository with different branches and collaborators are conflicts. We are going to force a conflict by modifying the “HelloWorld.cs” file in the remote branch and trying to make a “Push” from the local branch that also modifies it.

Before doing the Push as there are changes in the remote branch that we do not have locally, we must do Pull. We are going to make Pull and to solve the conflict from Visual Studio.
In the “Git changes” tab we can see the files that could not be merged automatically due to conflicts.
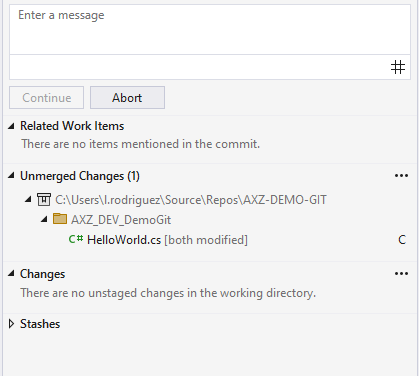
If we open the conflicting file, Visual Studio will open a tab where we can see on the left the changes of the local branch, on the right those of the remote branch and below, the result of the merge operation. We choose the changes that we want to keep, they can be all, only some or modify the code manually.
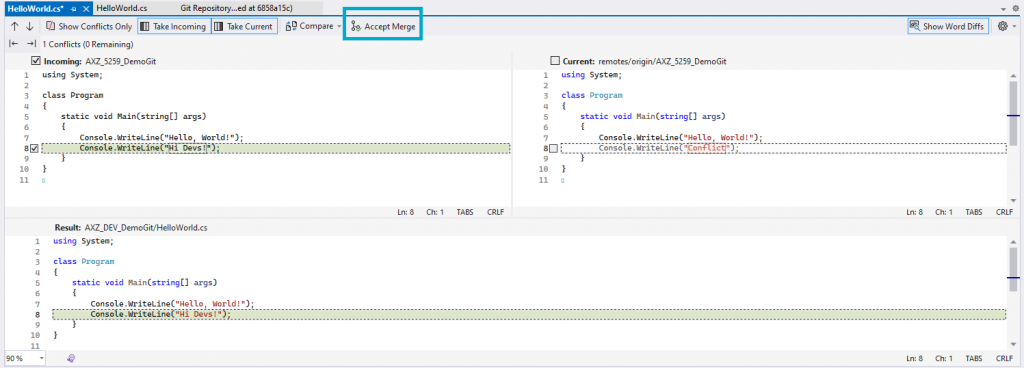
Once confirmed, we push to update the remote branch and the conflict is resolved.
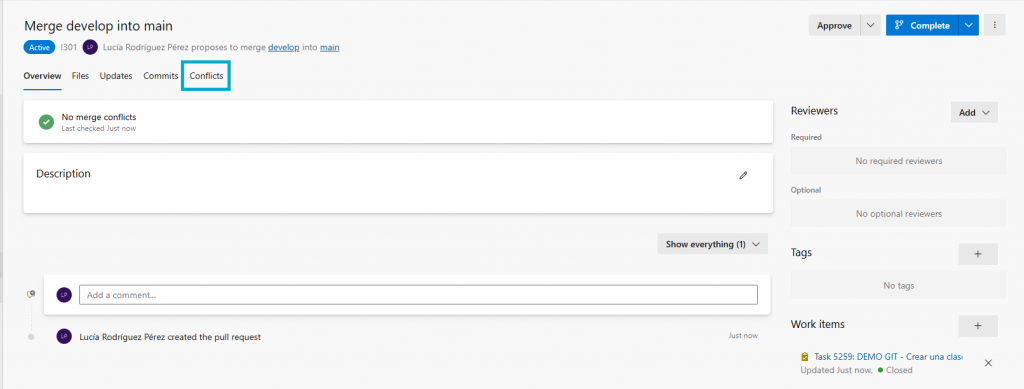
Now, the conflict is resolved. Another point where we can find conflicts is when making Pull Request. They are resolved in the same way, but with the Azure DevOps viewer. We choose the changes we want to keep and confirm the merge operation.
Best Practices
That would be all to close this article demonstrating basic Git operations from Visual Studio and Azure DevOps. Before closing, I would like to leave some recommendations to avoid the conflict problems we have seen in this last point, as well as other recommendations for working with Git.
- Make small change commits, so that traceability is greater and the risk of losing code or generating conflicts is lower. It will also make it easier for other contributors to have the most up-to-date code.
- Do not include credentials or private data in the code, since it will be stored in a remote repository.
- Update the local repositories frequently, in order to have updated versions of the code when we are going to modify it, thus avoiding conflicts and working with the real code.
- Work properly with the branches following the GitFlow Workflow recommendations.


