In all businesses, it’s common to manage advance payments, both from customers and to suppliers.
Dynamics 365 have the possibility to manage customers and vendors prepayments, but only in the vendor side module we have the possibility to register prepayments invoices that could be linked to purchase orders.
In this entry we’ll focus on how to manage the vendor prepayments.
For the Accounts receivable module, the operation will be homologous to the specific case of Vendors prepayments, which is also discussed in this entry.
Previous configuration
Before explaining how multiple prepayment invoices linked to a purchase order can be handled, first of all we need to set up a Procurement category at Procurement and Sourcing module. That category is mandatory when will process a vendor prepayment invoice. This category would imitate the behavior of an item in a purchase order .
To create a new category, access the Procurement and Sourcing module and go to Procurement categories:
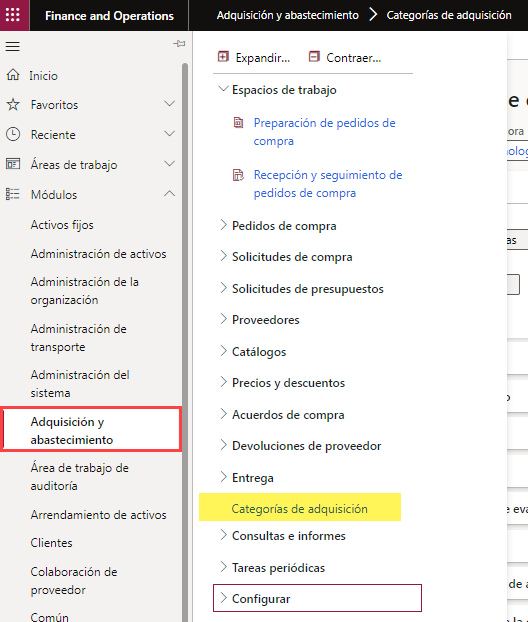
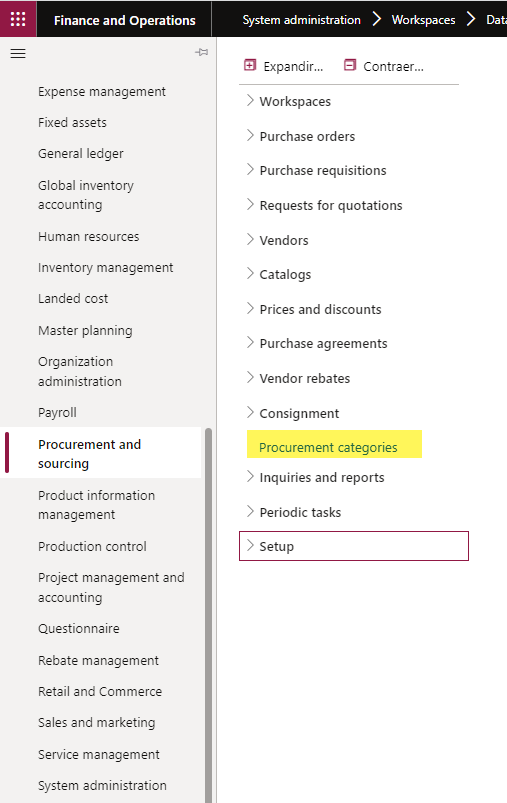
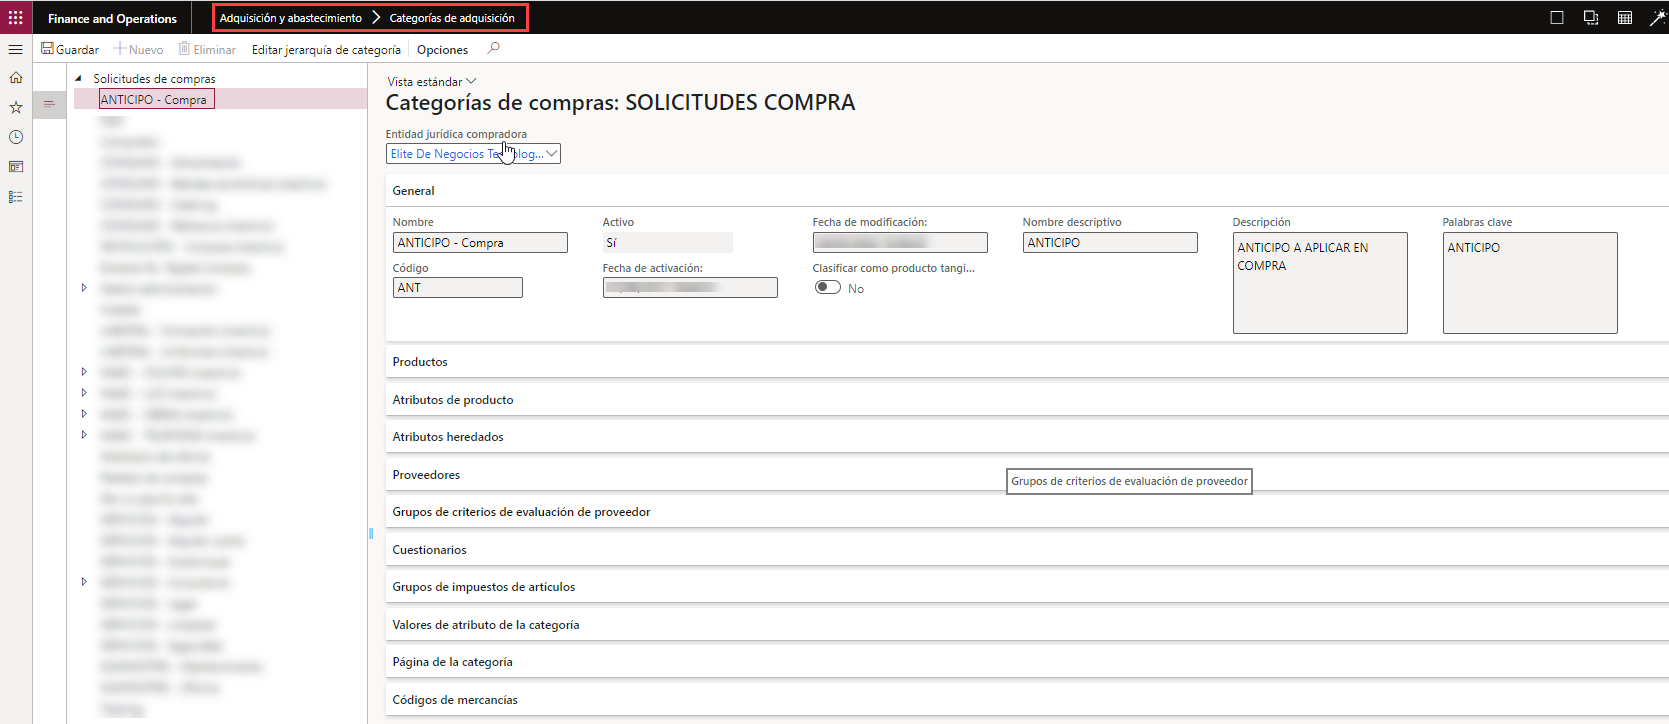
Once you have a procurement category to assign a prepayment, we need to set up the posting profile to use that prepayment category just as we do when we use an item in a purchase order. We’ll need a vendor profile too, to collects the vendor balance with this transactions type.
In other words, we need a credit account (vendor’s accounting profile dependent), and the debit account (based on the category posting profile)..
(1) Through the Accounts payable module, Accounts payable>Setup> Vendor posting Profiles, we can configure the account which collects the vendor balance when we’ll post prepayments invoices. Therefore, as shown in the following screenshot, it’s perfectly separated from the other posting profiles:

(2) Through the Inventory management module, Inventory Management > Setup > Posting > Posting, accessing to the Purchase Order menu and selecting Prepayment option you will be able to set up the account for the amount basis of the vendor prepayment invoice:
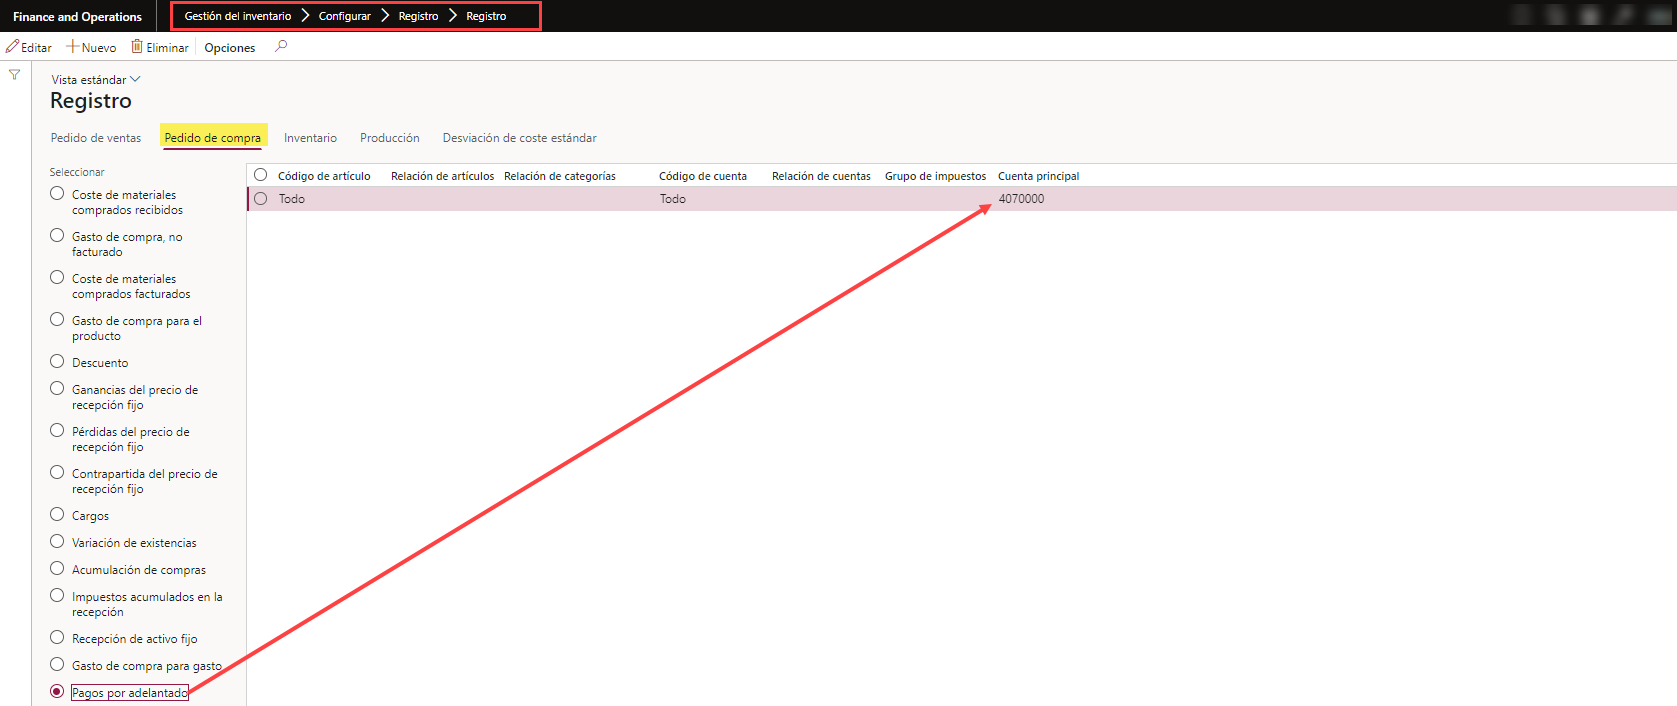
In the screenshot we have selected “All” in the Item Code field, but note that we can also select Table / Group and Category. This will depend on how we want to configure our accounts.
Parameters and advance payments
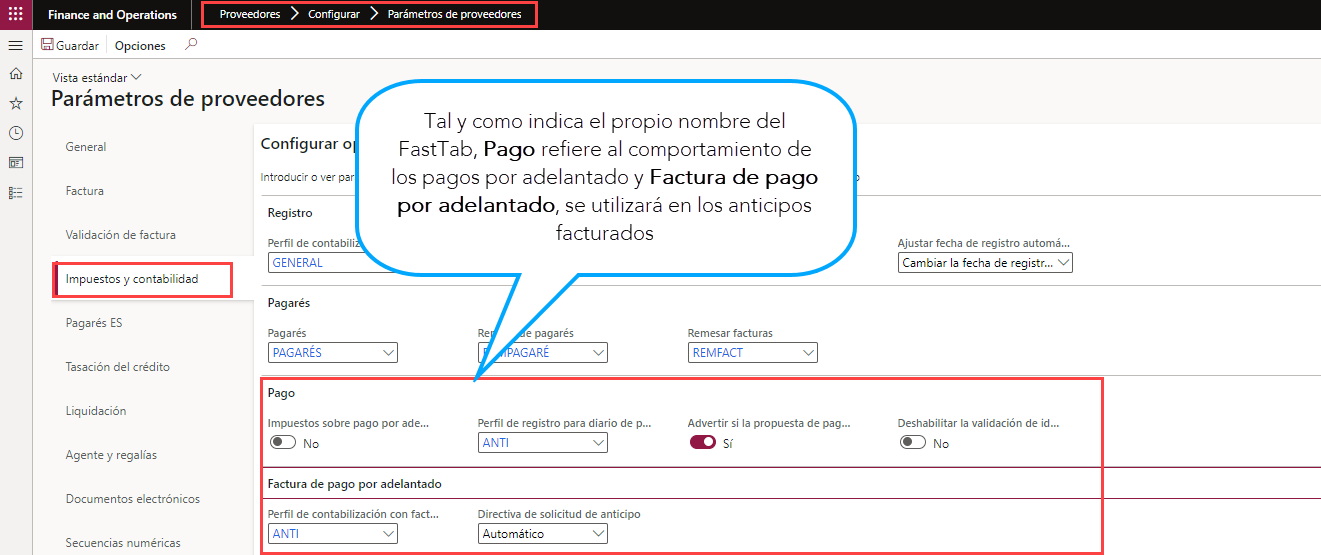
If the posting profile for vendors prepayments invoices is the same as the profile we are using in Advance payments, (do not confuse them with the vendor prepayment invoice, because the Advance payments are processed through the vendor payment journals), we need to configure a valid account to post both transaction types..
From Accounts payable>Setup>Accounts payable parameters and accessing to the Ledger and Sales tax tab, we can associate the profiles for advance payment or prepayment vendor invoices:
Payment in advance (functionality equivalent to the customer module)
At this point we are going to show how the Advance Payment works.
We will see clearly how its behavior differs completely from the behavior of the vendors prepayment invoices.
We access to Accounts payable> Payments > Vendor payment journal, and we proceed to create a new payment journal:

Accessing to the Lines, we will enter the necessary information to make the advance payment:

It’s essential to access the Payment tab, to tick the option Prepayment journal voucher, which will not only mark the transaction as an advance payment, but will also vary the posting profile depending on the settings indicated in Vendor Parameters:

After recording the journal, we can see the big difference in behavior between advance payments and invoices by accessing to the vendor open transactions. In the open transactions, we can see a balance in “our” favor as the issuer of the payment:

This is the big difference with an invoiced vendor prepayment, where no balance will appear in our favor, because once the prepayment invoice is paid, it’s a closed transaction. The vendor issued an invoice with a concept and this was paid, there’s no open transaction.
Advance payment invoicing
Once we have seen the previous configuration and how advance payments work, we are going to see how to proceed with the vendor prepayment invoices and how these are linked to the purchase orders that originate them.
To do this, we will access to a purchase order, for example from Accounts payable > Purchase orders > All purchase orders, and through the action Advance payments, from the Purchase order form menu, we’ll introduce the data to generate the prepayment invoice:

As shown in the previous screenshot, we can enter a Description, select between a Fixed amount or a Percentage of the total amount of the purchase order, and we must select the Procurement category to which the advance payment will be assigned (this is the prerequisite we indicated in the first point).
To post the invoice for these advance payments, from the Invoice menu and through Prepayment invoice action, we’ll proceed to generate the prepayment invoice, as shown below:


After posting, in addition to generating a vendor invoice for the prepayment amount, a record is created in Open prepayments form:
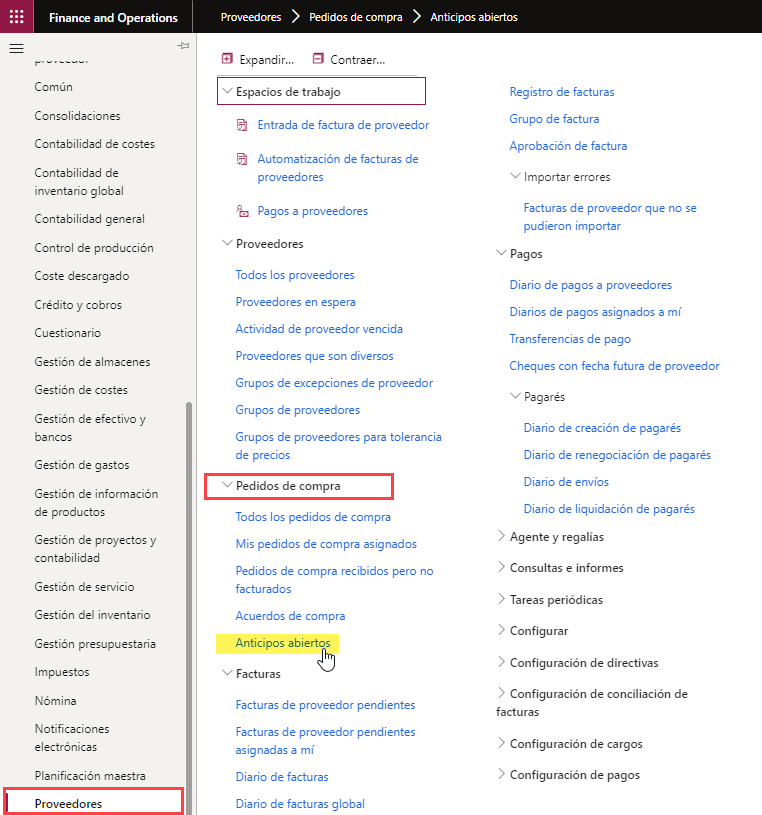

The next step, once the prepayment has been generated from the purchase order, is to pay it.
To do this, and from Open prepayments form, roll the New menu to create and register a payment journal for the amount of the advance through the Vendor payment journal menu option:
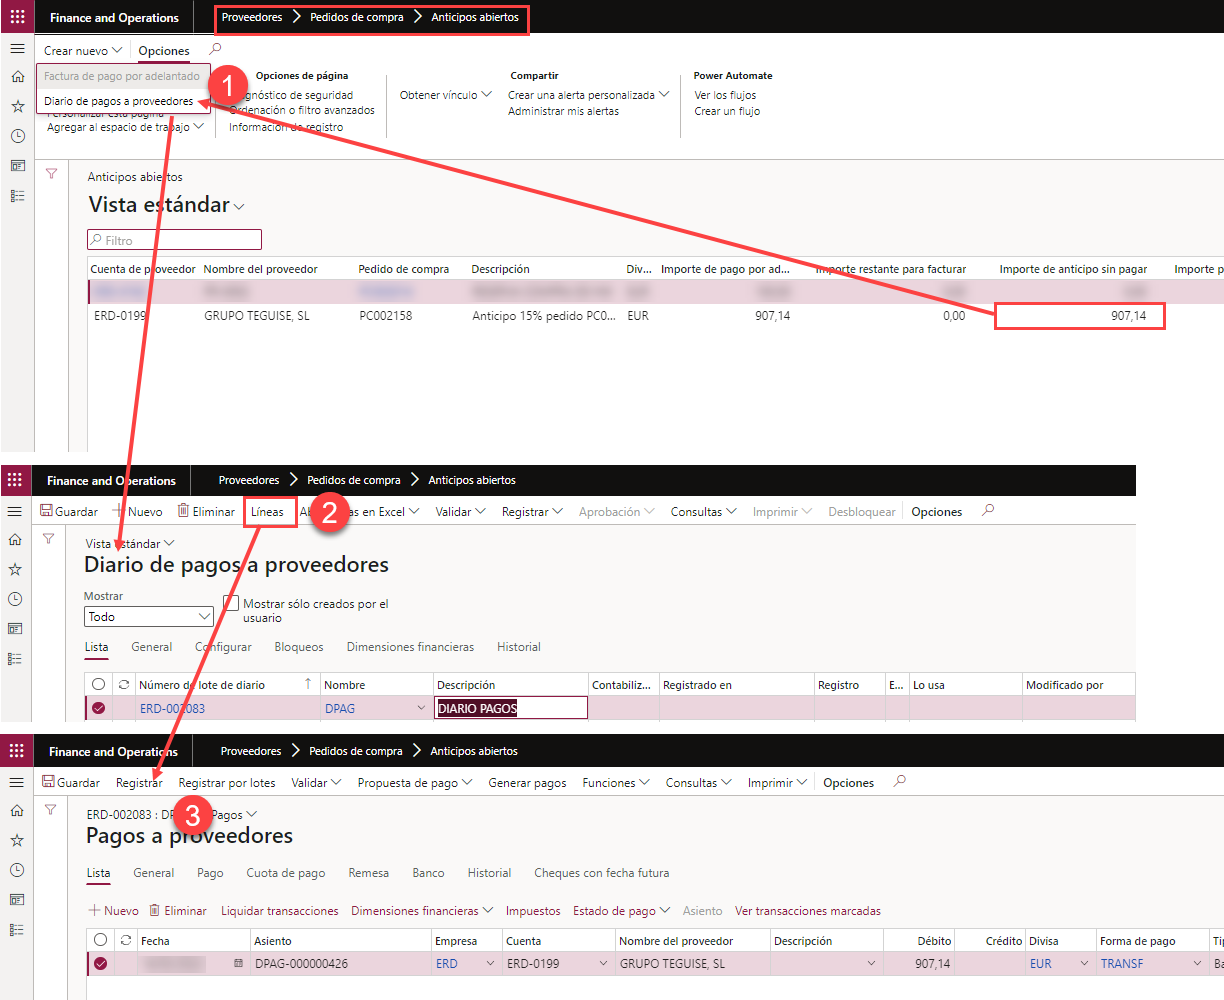
As we can see in the previous screenshots, without moving from Open prepayments form, and through the menu option New > Vendor payment journal, we can create and post the payment journal to settle the invoice, and all this without wasting an extra click accessing the Payment journal from the module menu.
So, it’s clear that from Open Prepayments form, we can centralize the information and actions regarding vendor prepayment invoices.
We can notice that in the same New menu, we could create the prepayment invoice for the selected line, in case we hadn’t done it from the purchase order, through the option Prepayment invoice that is the same option we could see in the Purchase order form.

Continuing with the Vendor Payment Journal, once posted, we close it to get back to the Open Prepayments form, and after updating the information, we can see how the amount paid acquires the status of “Unposted paid amount”:

This status means that an invoice was generated and an prepayment was made, but it hasn’t yet been applied/settled with any purchase invoice.
Once we have this amount, in order to make new prepayments and generate more invoices for this concept, we can access to the purchase order again (by clicking on the link of the order ID in the same line, at the “Purchase order” column, we can access directly), and repeat the action Prepayments.
When we execute this option again, we will have to indicate a value greater than the initial one in order to make a new advance payment on the same purchase order.
For example, let’s imagine the case in which our vendor issues an invoice prepayment of 15% when formalizing the purchase. Then, at the beginning of the manufacturing process of an item we want to buy, he sends us a new prepayment invoice with an additional 15% for the procurement of materials..
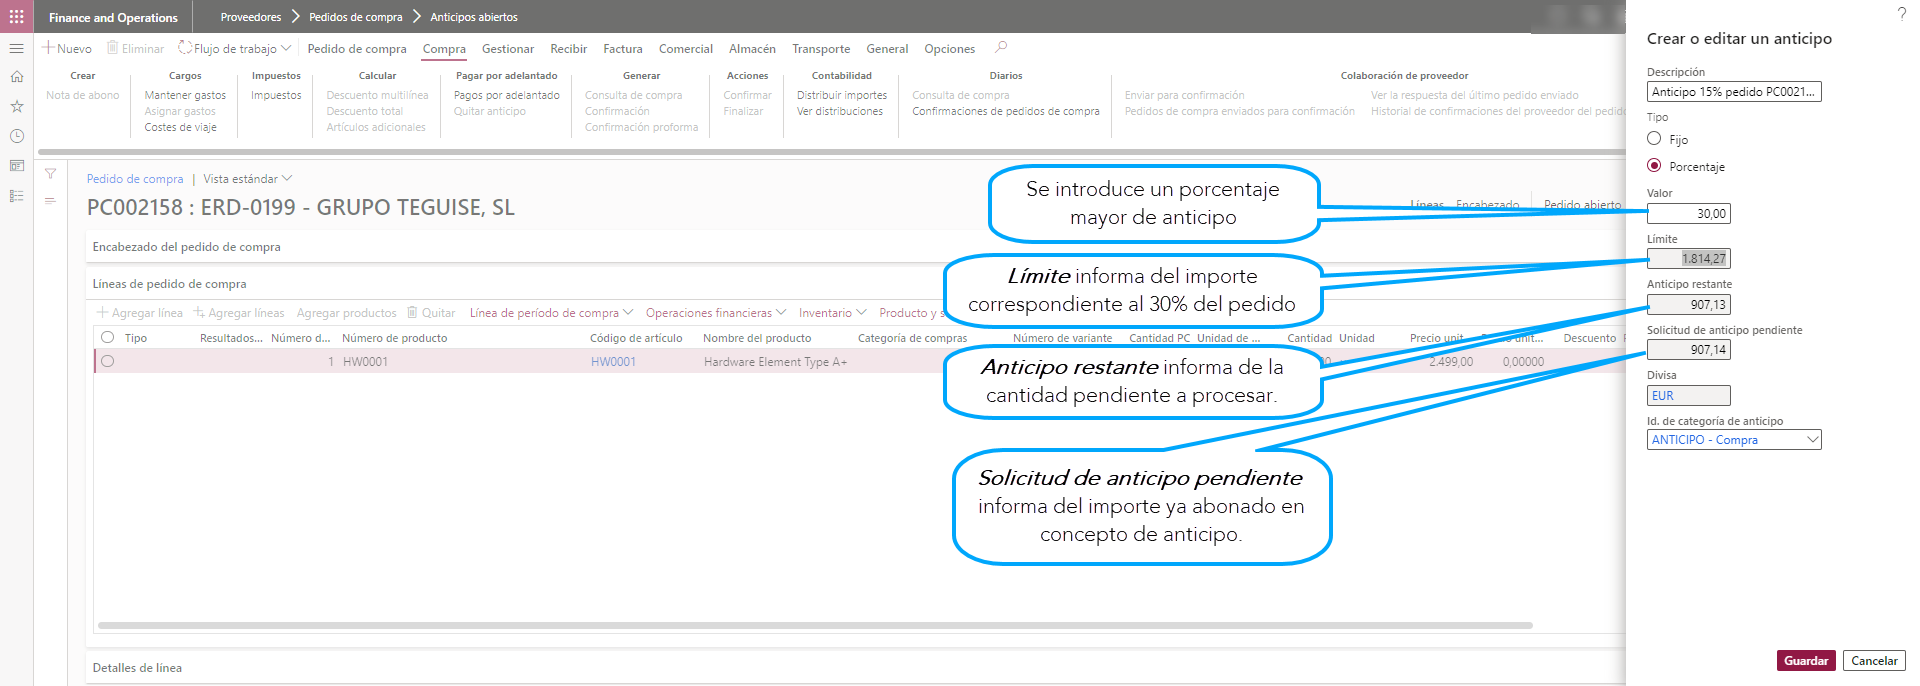
In this case, we would access to the order and click on Prepayments to enter the new percentage, this time 30%. This corresponds to the additional 15% for the procurement in our example.
When the system launching the Prepayments dialogue, will show us through the Limit field the amount that represents this 30% of the total order. In addition, the field Prepayment remaining will show us the part pending to be invoiced and paid (this additional 15%). And lastly, Prepayment application remaining informs us of the amount that has already been paid previously:
Again, to post a new invoice for this additional prepayment, we will repeat the invoicing process through Prepayment Invoice:
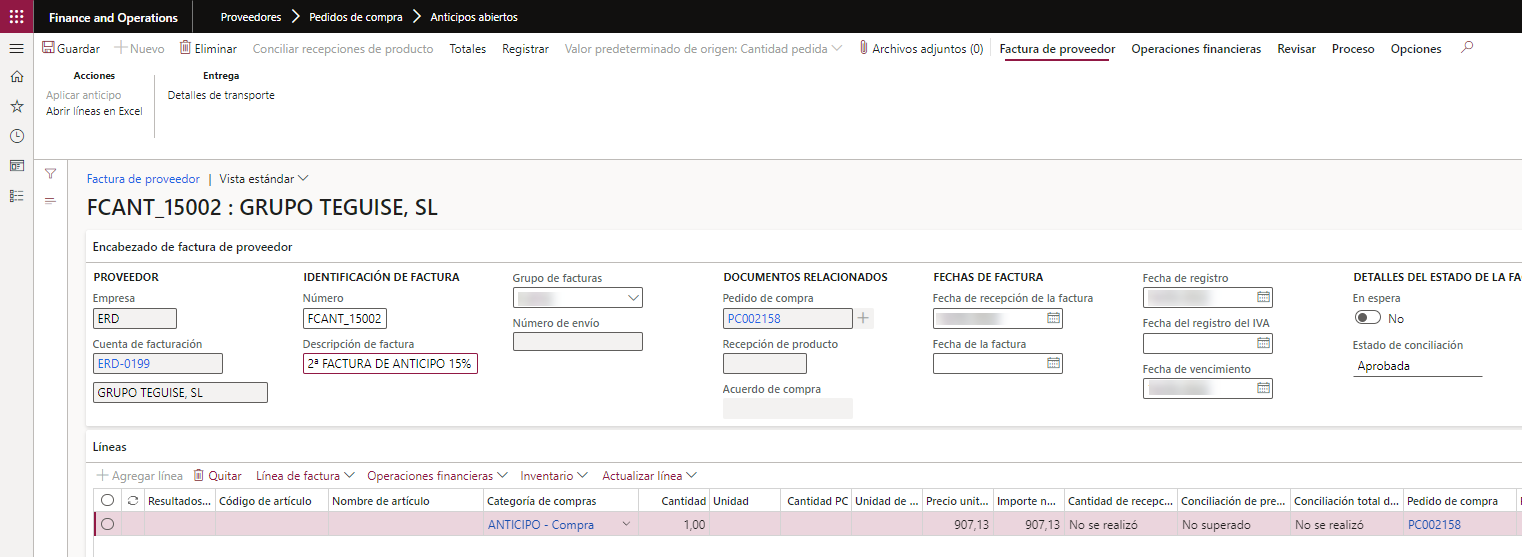
Back to Open prepayments form, you will notice that the amount shown under Prepayment amount column has increased and there’s a new Unpaid prepayment amount:

We’ll repeat the payment posting by creating a new Vendor payment journal for the amount that figures on the Unpaid prepayment amount column, after which Unposted paid amount will increase until it again equals the Prepayment amount:

Now we have seen how to manage multiple vendor prepayment invoices that may or not be applied to the order after invoicing
Before showing the final invoicing process, another alternative is offered below.
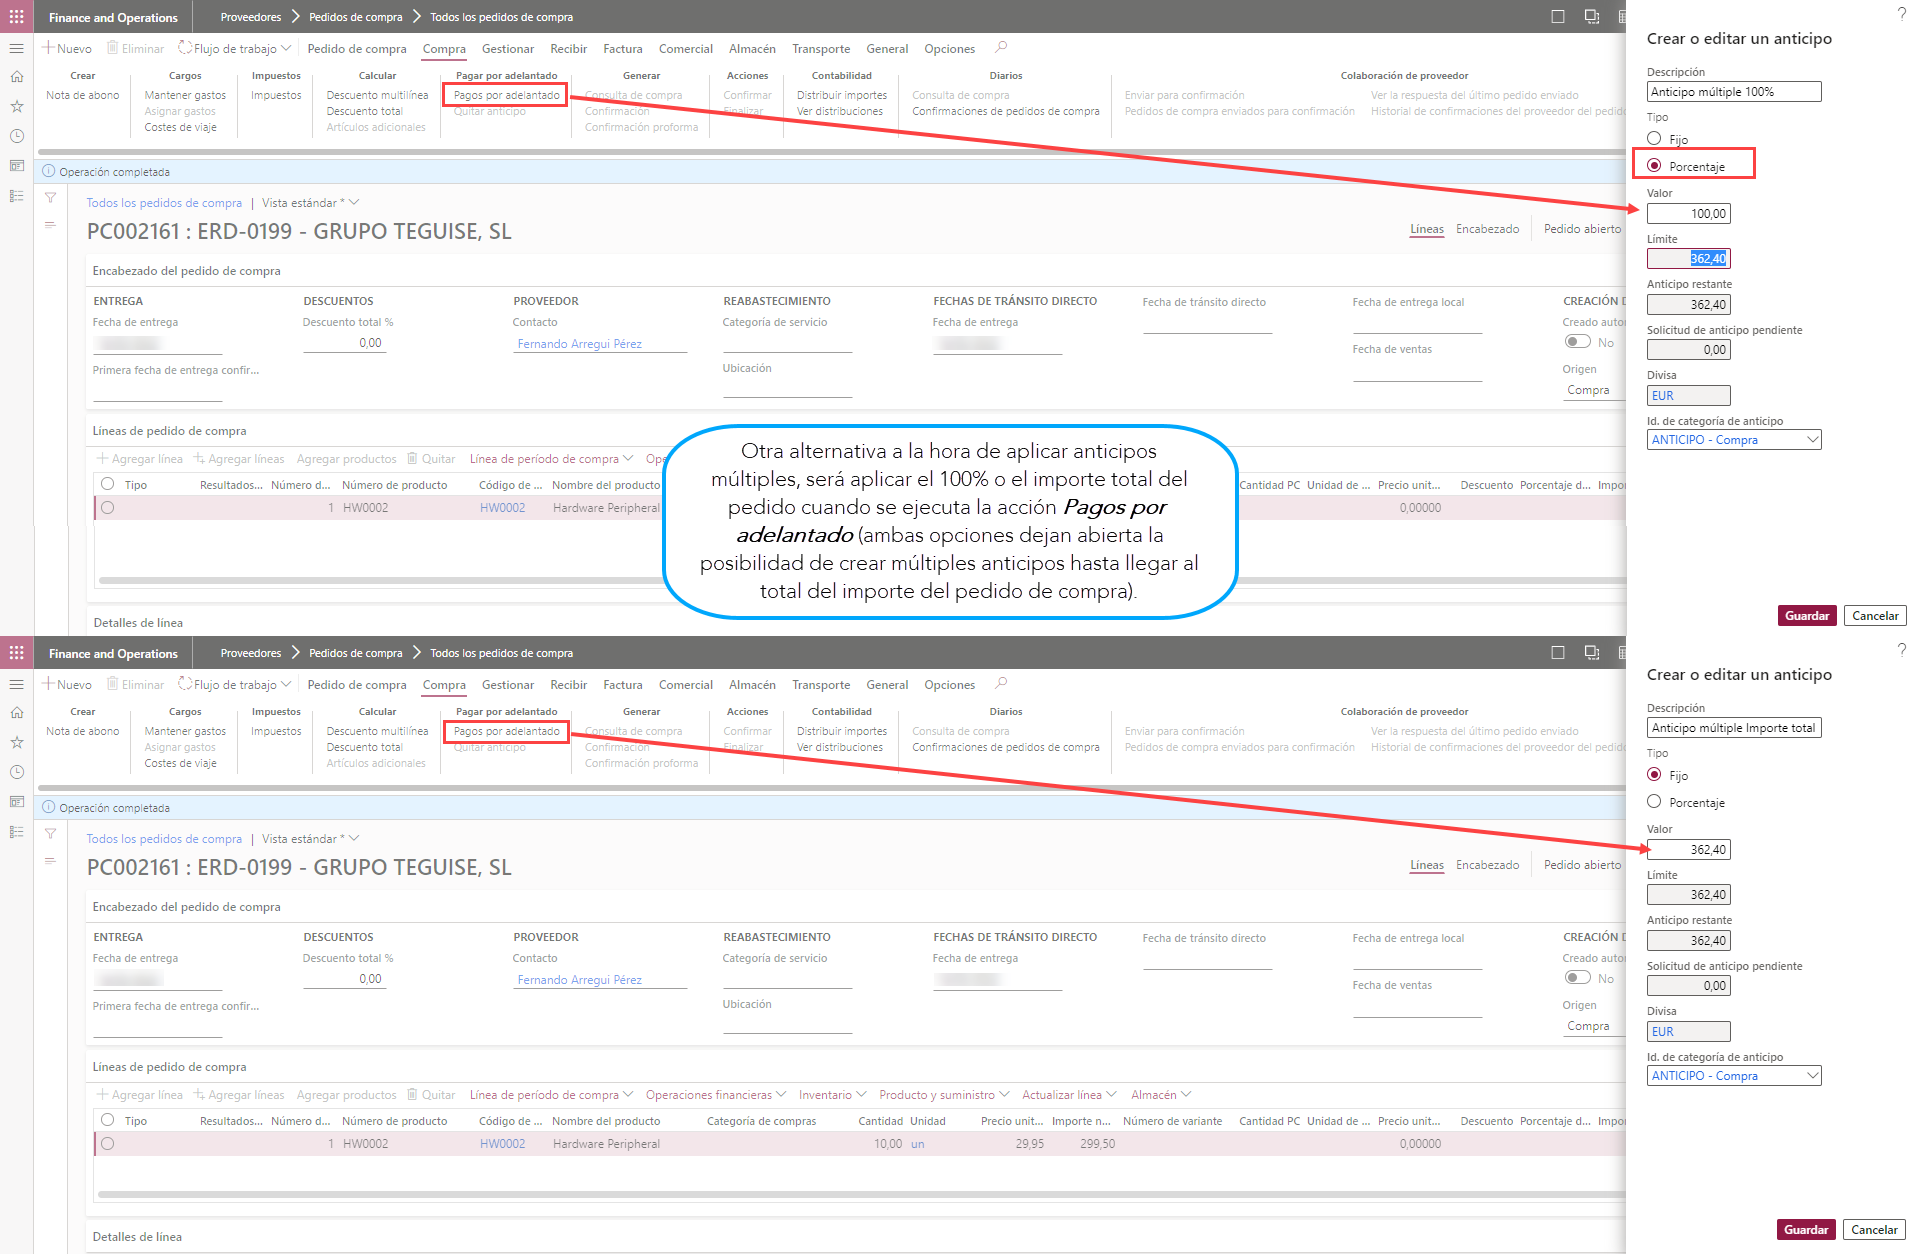
This other possibility is to apply 100% prepayment at the initial time. We could also use the total amount of the order, but in the event that the order could suffer variations or we could add items to the same order, this initial “limit” of amounts to be prepaid wouldn’t coincide with the total of the new order..
Again, we’ll execute the Prepayment action. This time, we will indicate 100% of the amount to be prepaid. This enables the possibility of invoicing multiple prepayments freely for any amount, up to the maximum amount. The maximum amount is the total amount of the purchase order from which the prepayment are being launched:
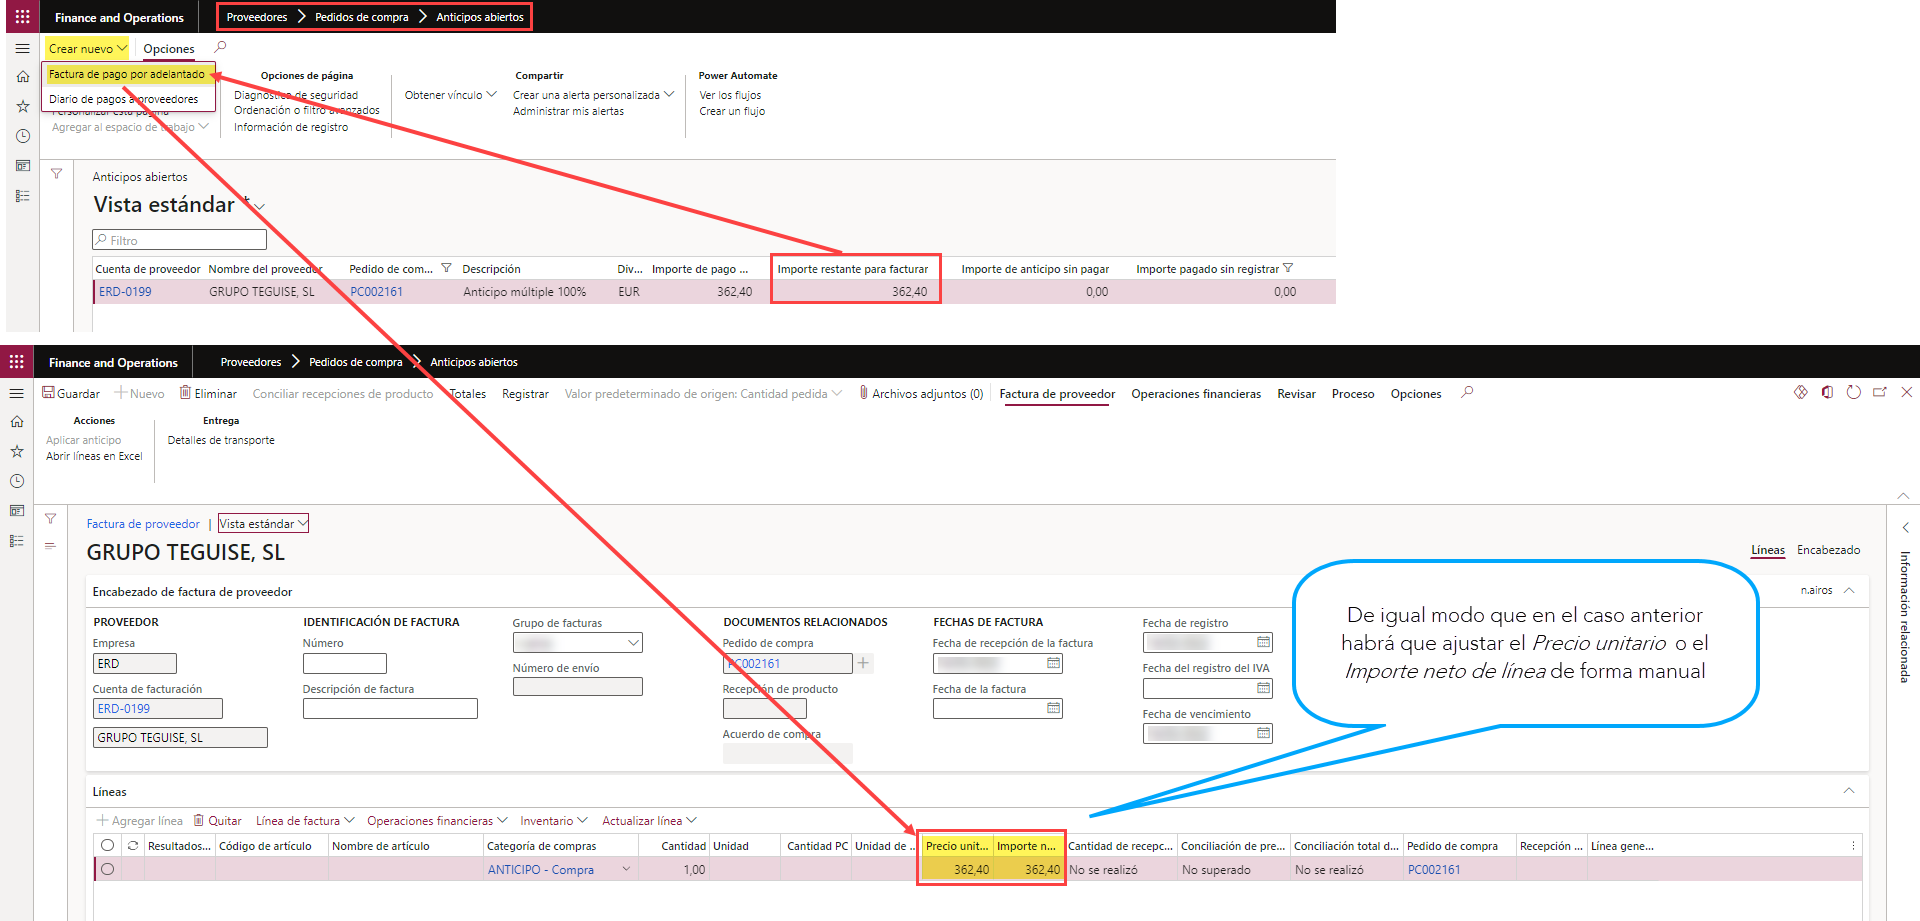
Now, we proceed to the generation of the prepayment invoice, and this time the possibility of generating the invoice through the Open prepayments form is shown:
·Through the same menu action of Prepayment Invoice, but accessing from the Open prepayments form and create New:
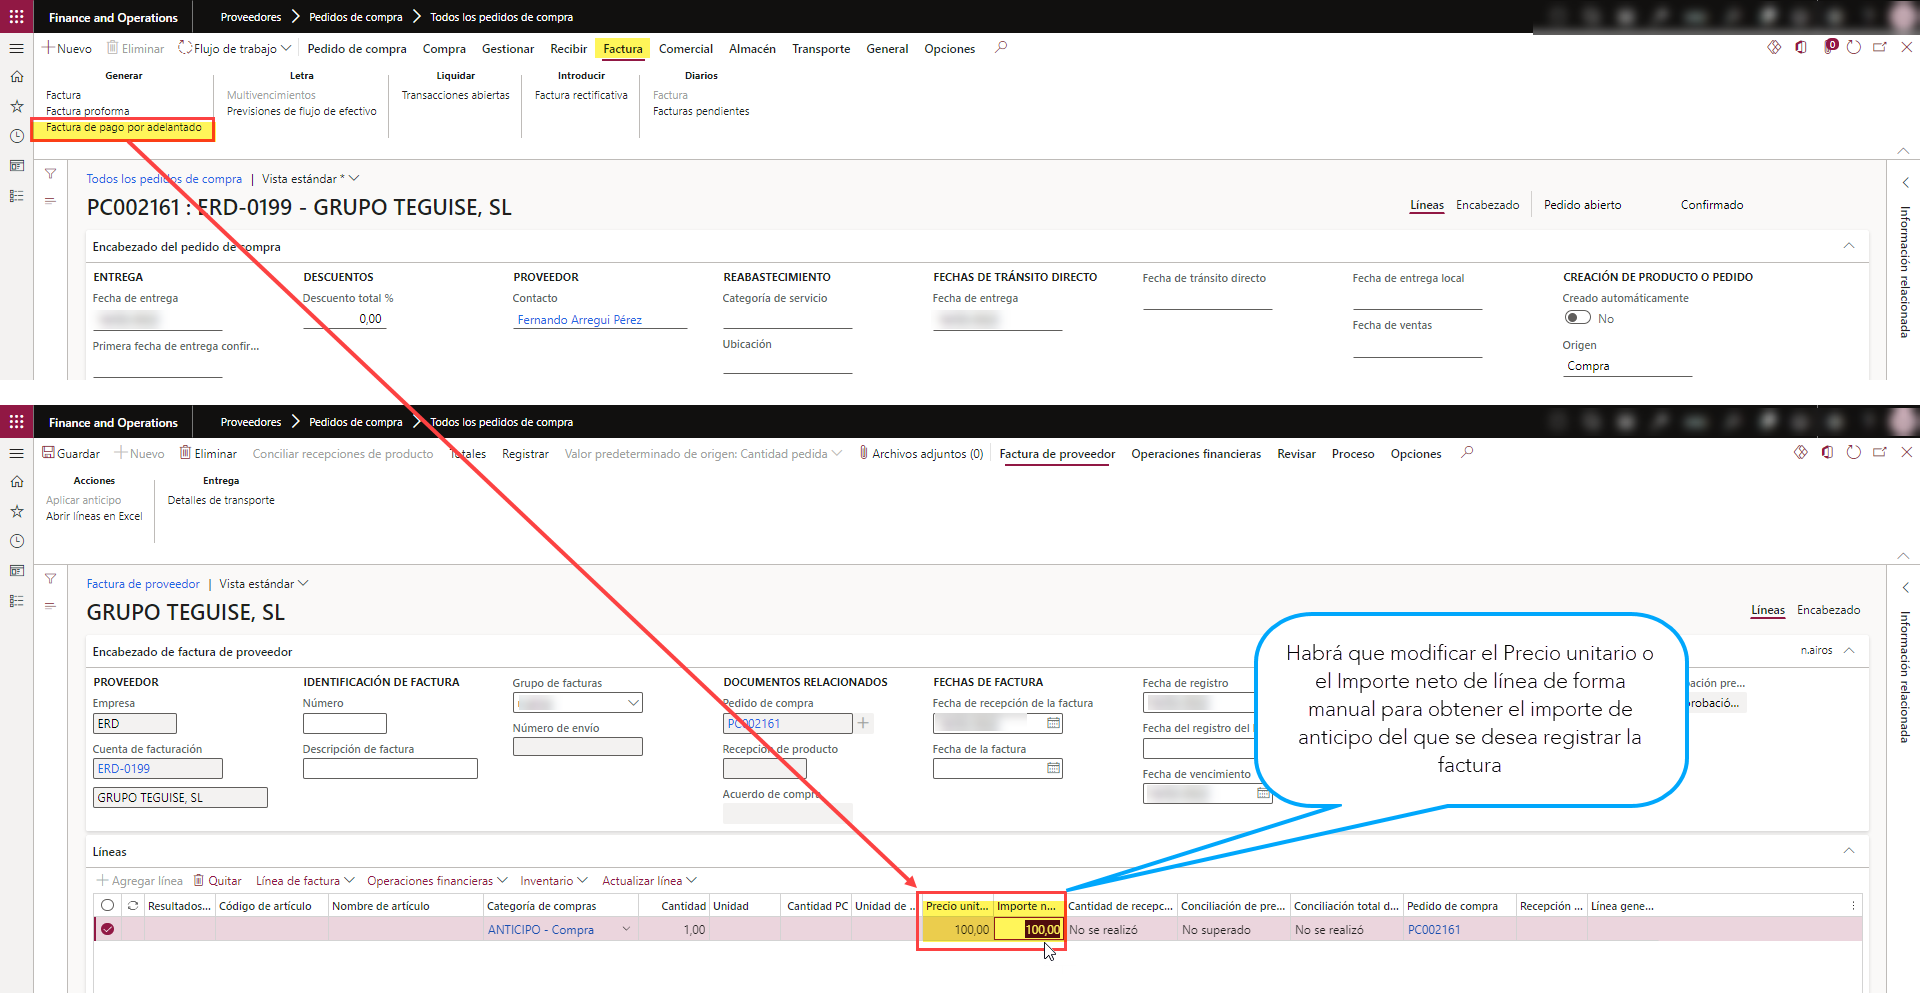
·Finally, all that remains is to see how to apply the prepayment(s) to the purchase orders from which they were generated.
To do this, we are going to generate the invoice of the purchase order, executing the action Invoice from the group of options Generate of the menu Invoice of the purchase order:
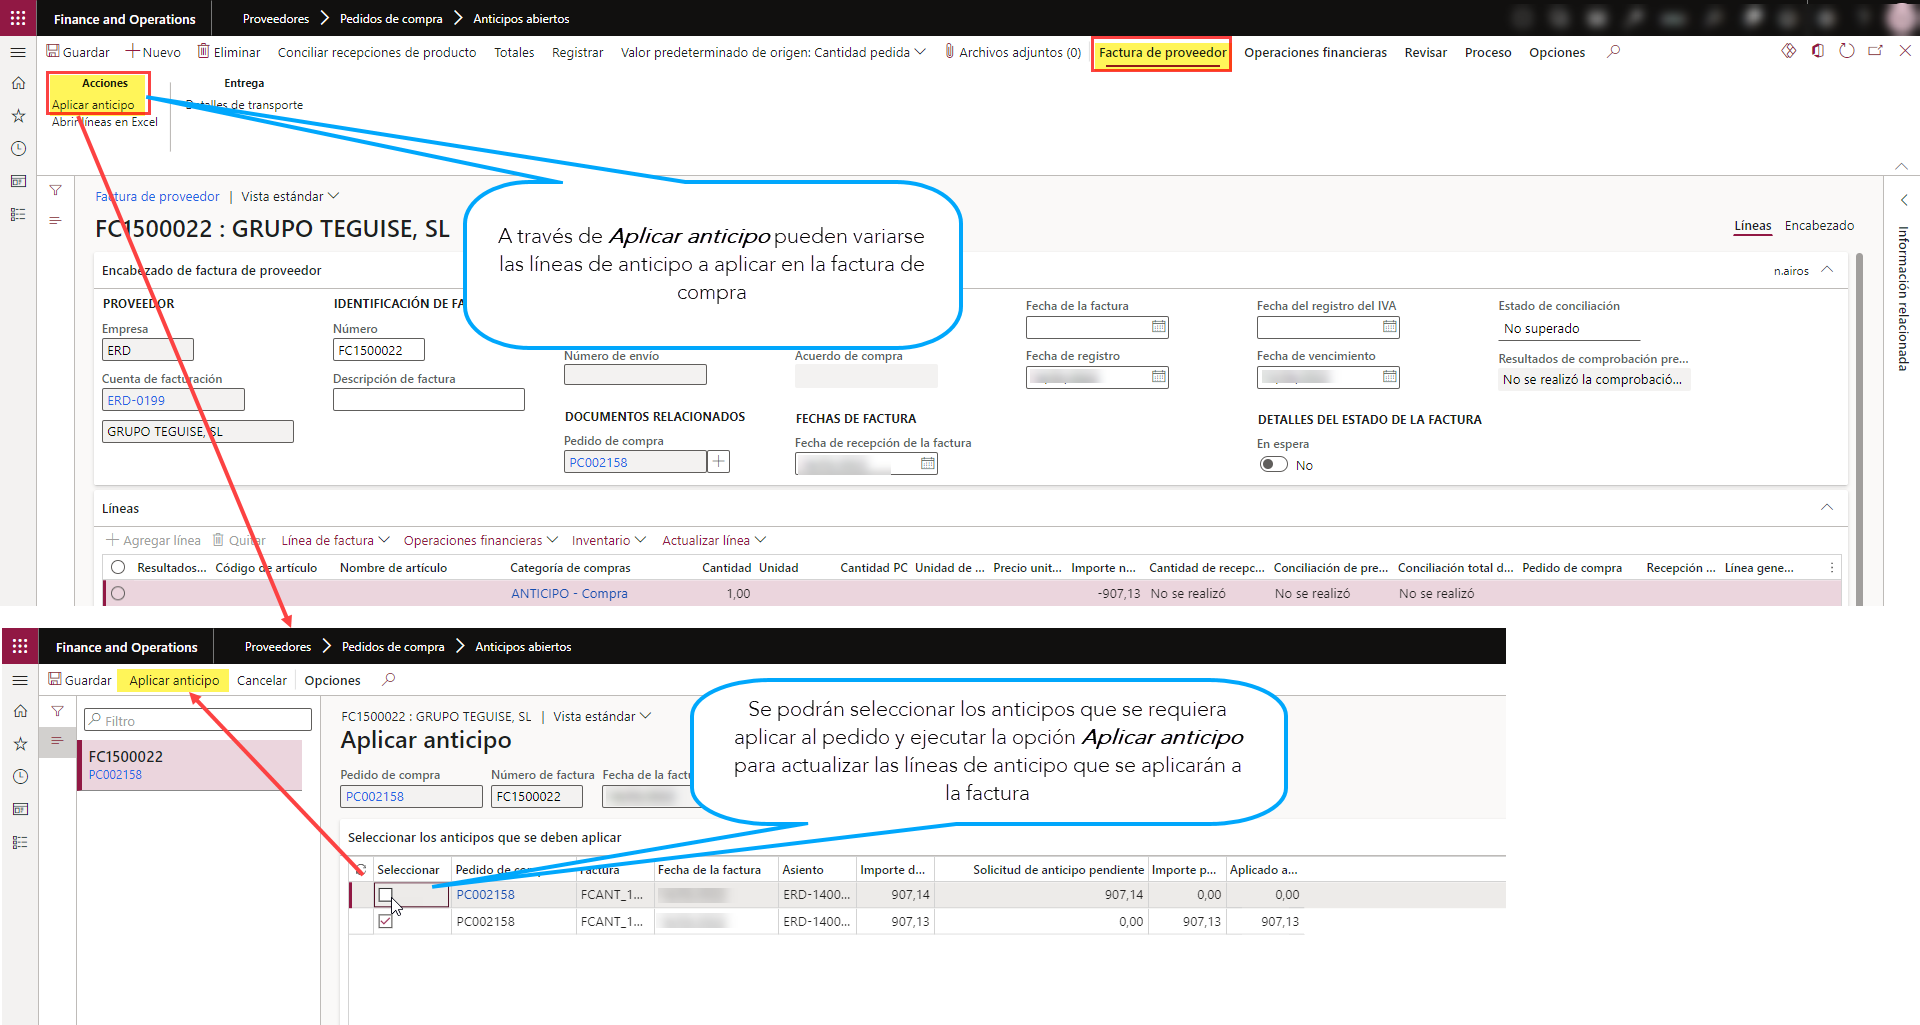
Through the action Apply prepayment in the Actions group of the Invoice menu, we can modify both the advances to be applied and their amount:
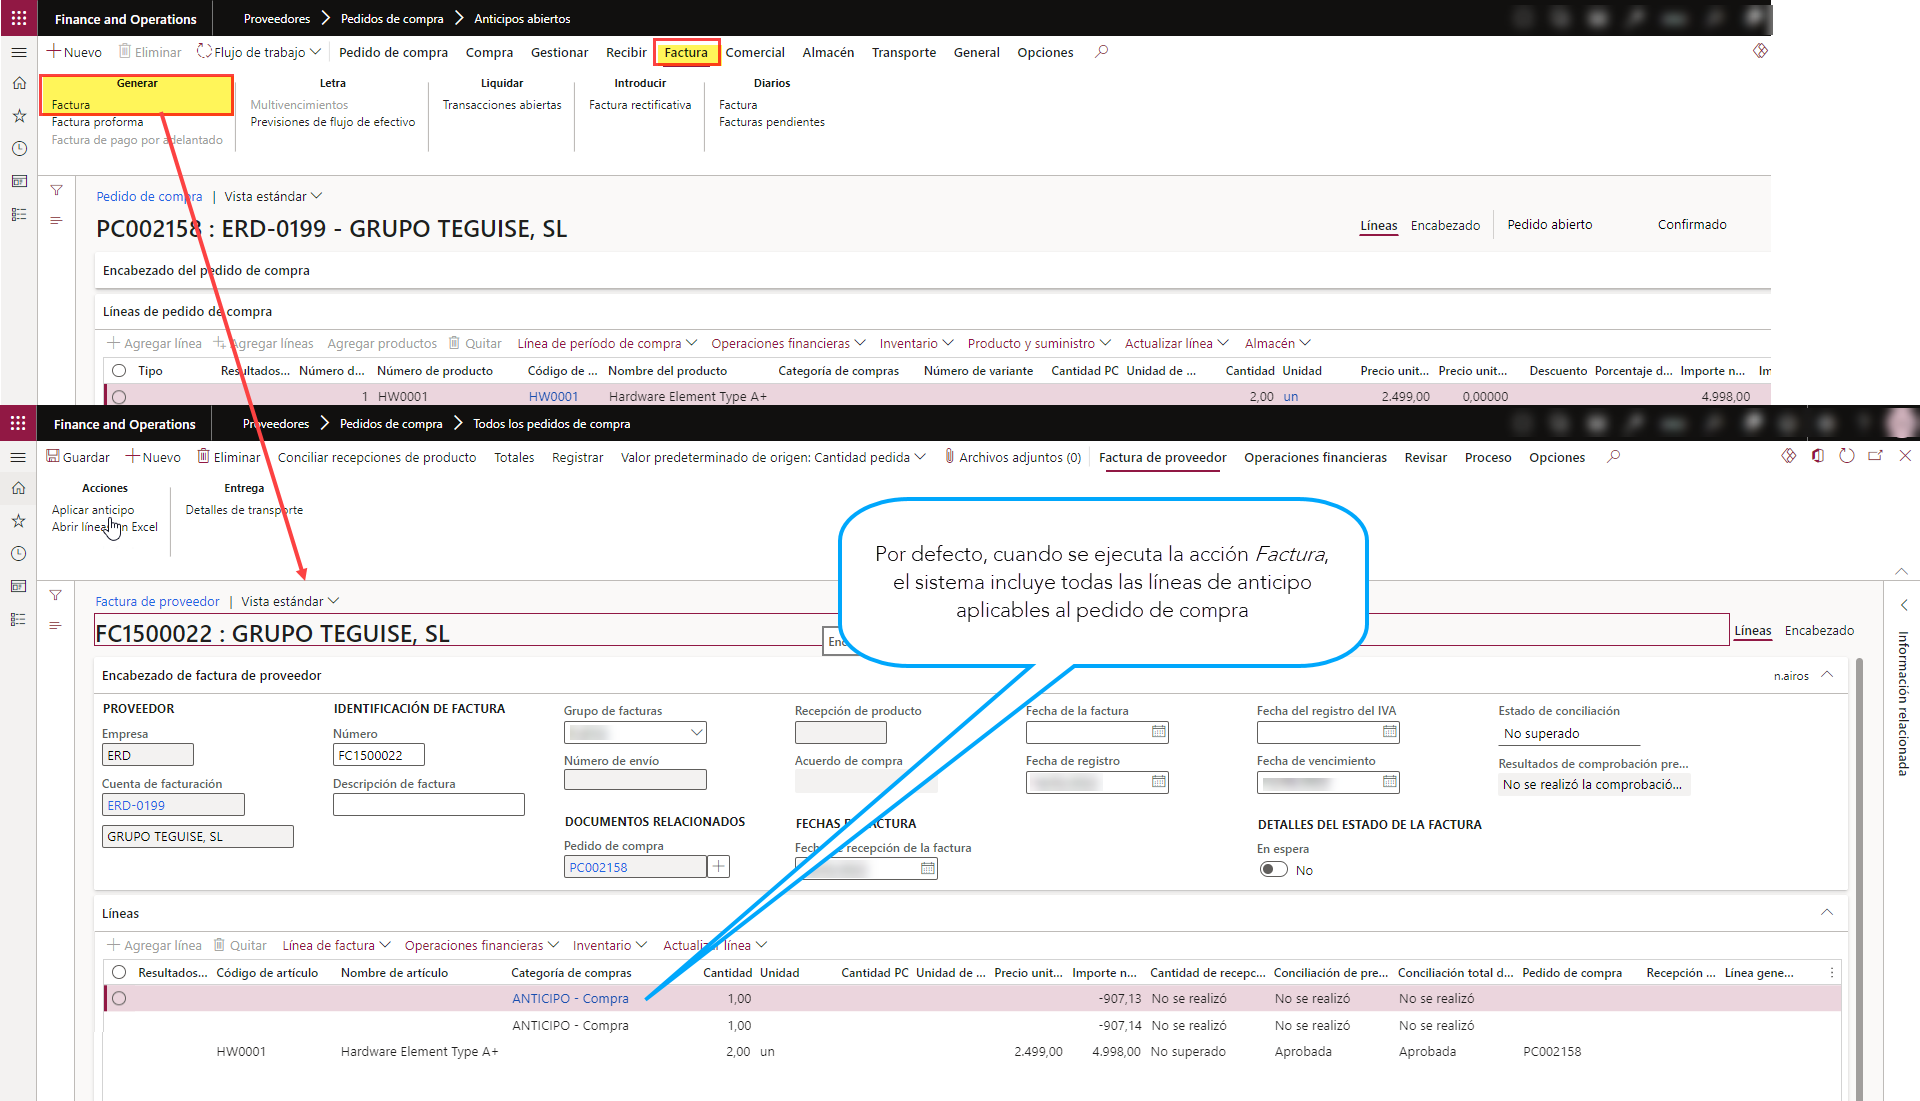
Through the Apply advances action of the Actions group of the Invoice menu we can modify, both the advances to be applied, and their amount:
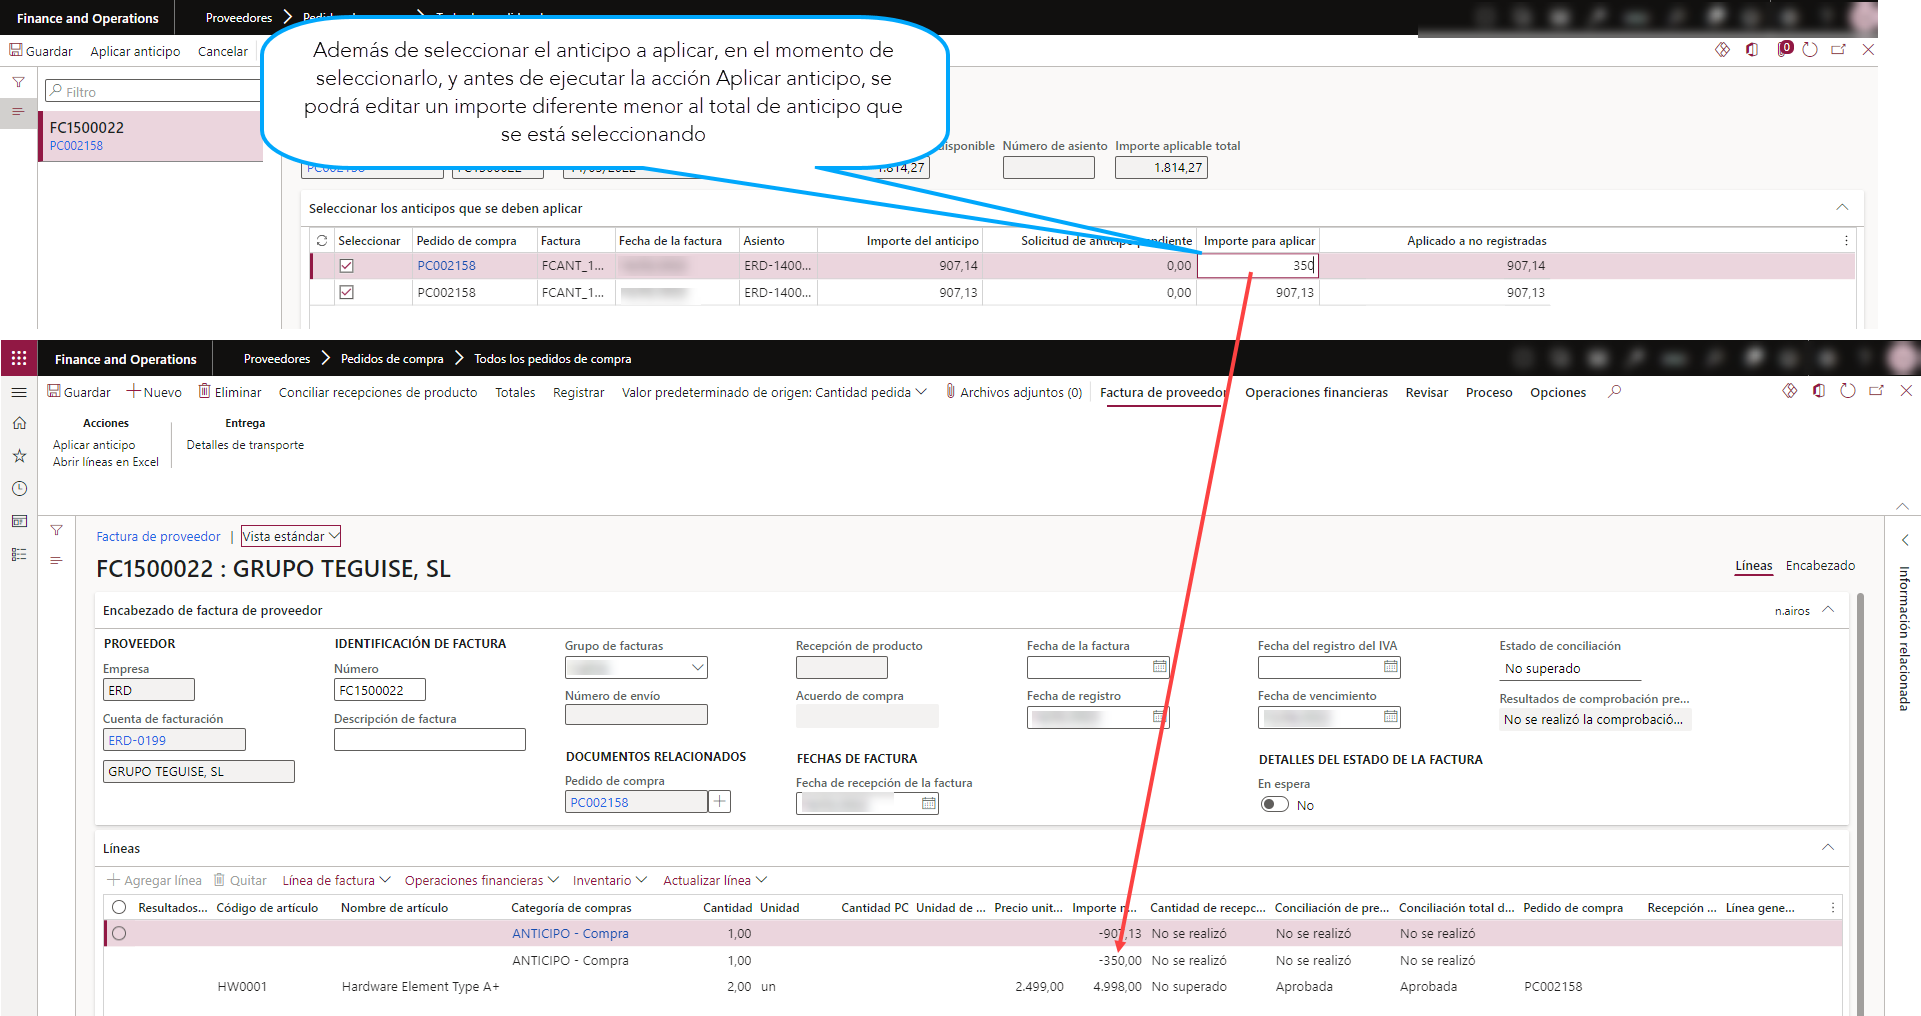
At this point we can post the purchase invoice.
In the example shown in the screenshot below, we have applied only one prepayment of the two we had available at the time of final invoicing of the purchase order.
Once the invoice is posted, the system informs us of this and of the possibility of applying the remaining prepayments to other invoices from this vendor:

To see what happens in this case, let’s see what happens when Generate Invoice for another purchase order of the same vendor.
Through the Apply prepayment action we could see the possibility to choose between a prepayment linked to the purchase order in question and the prepayment that we didn’t apply previously:

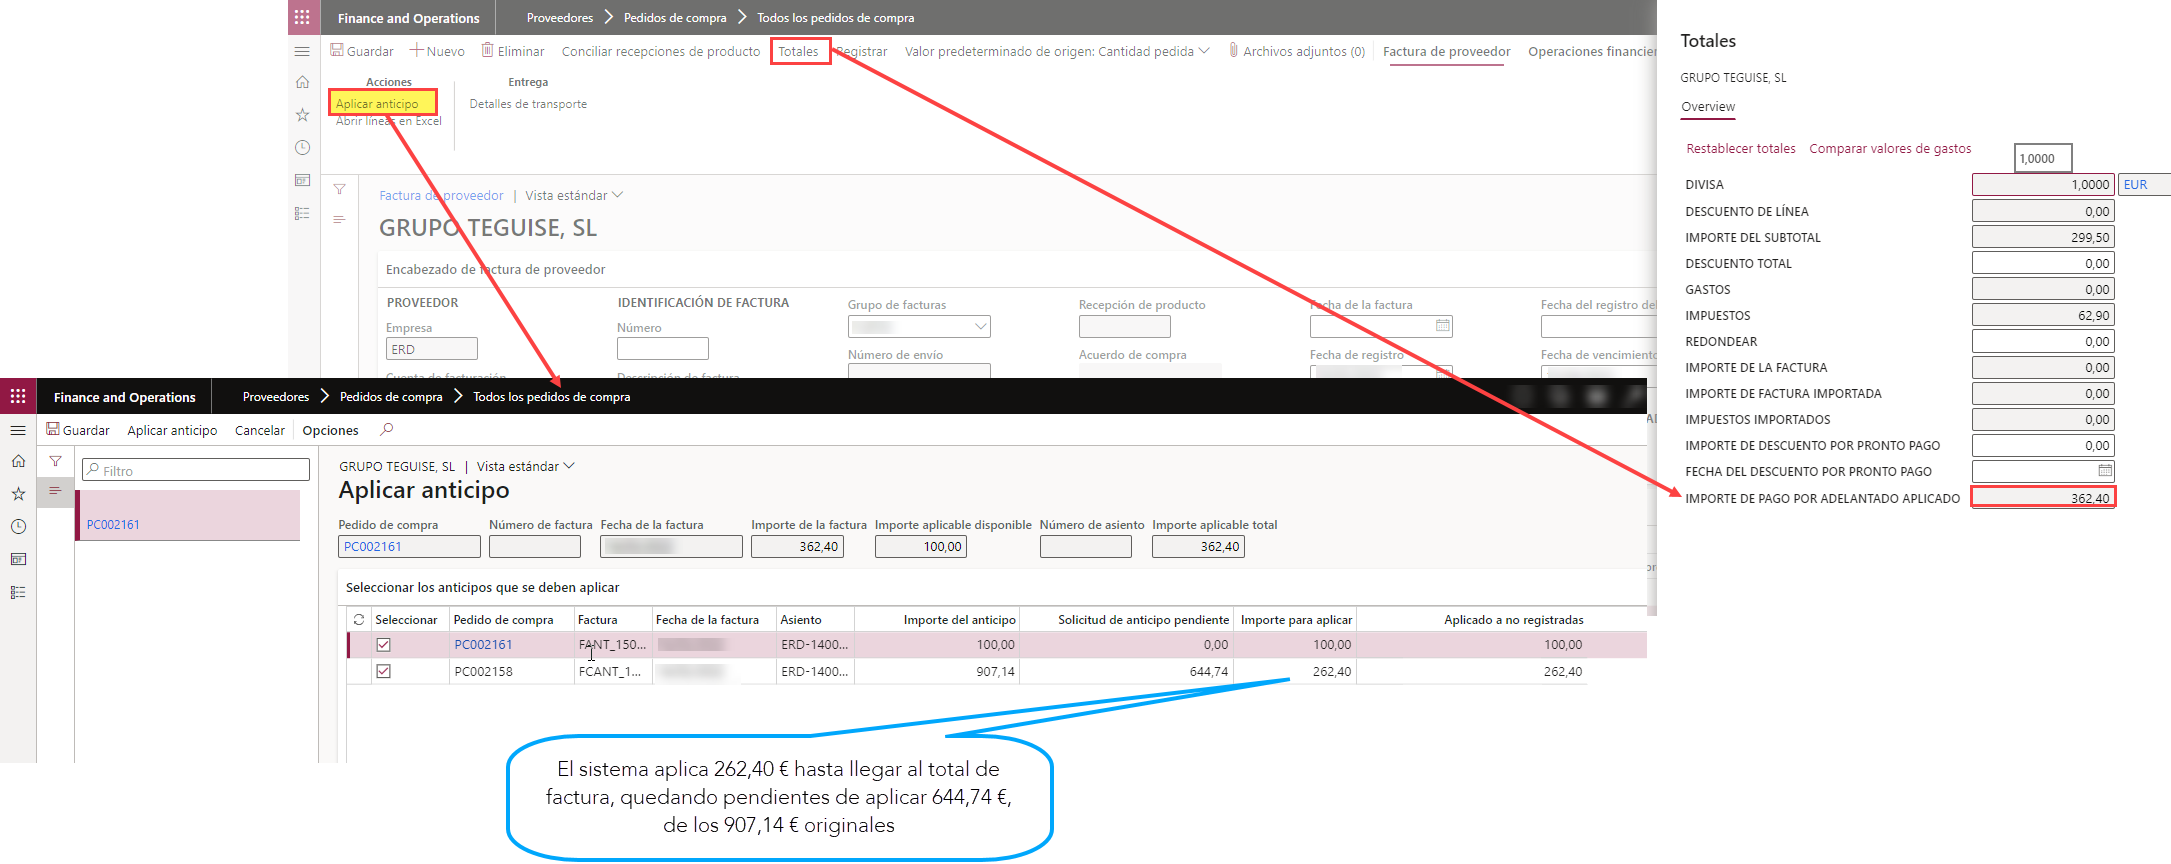
The same amount still to be applied or recorded can be consulted in Open prepayments form:

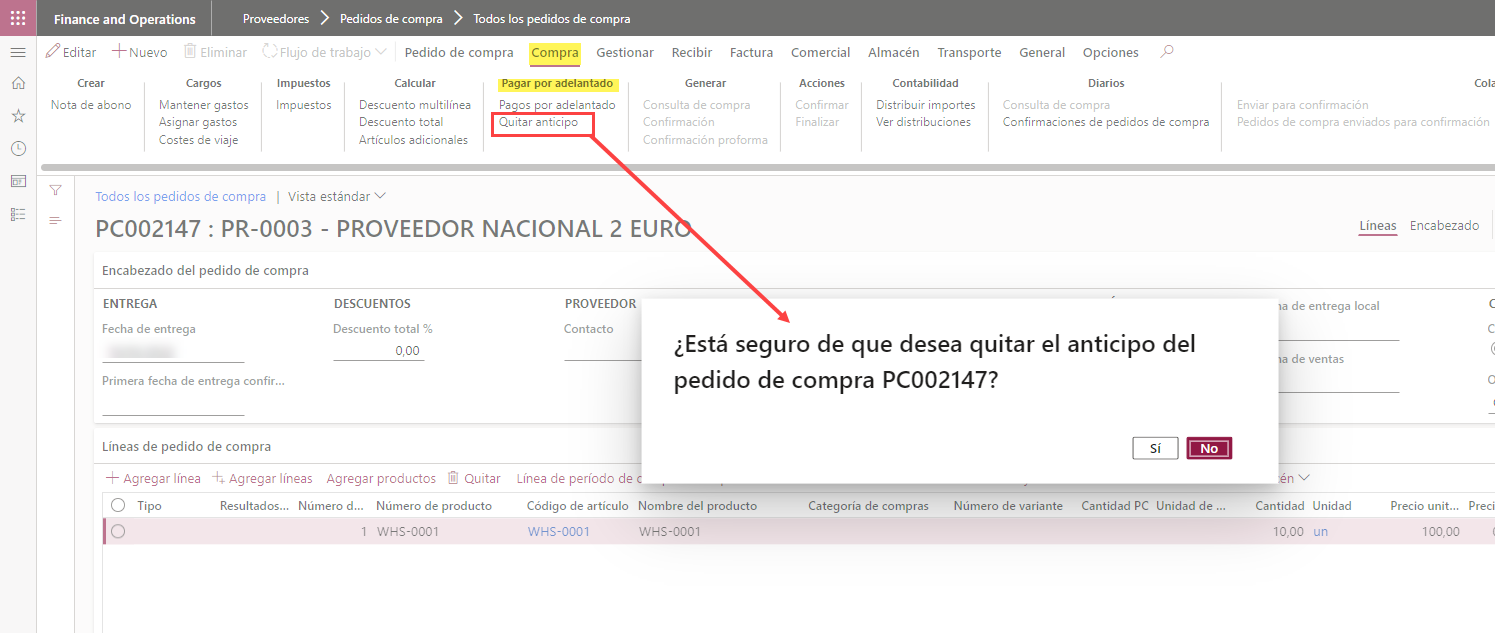
It’s important to note that those prepayments created from purchase orders that haven’t been invoiced, or that despite having been invoiced, haven’t been settled through a vendor payment journal, may be cancelled by executing the action Remove prepayment found under Prepay in the Purchase action menu:
(1) If the prepayment hasn’t been invoiced, the system requests confirmation to remove the prepayment associated with the order:
(2) For prepayments not paid through vendor payment journals that have already been invoiced:
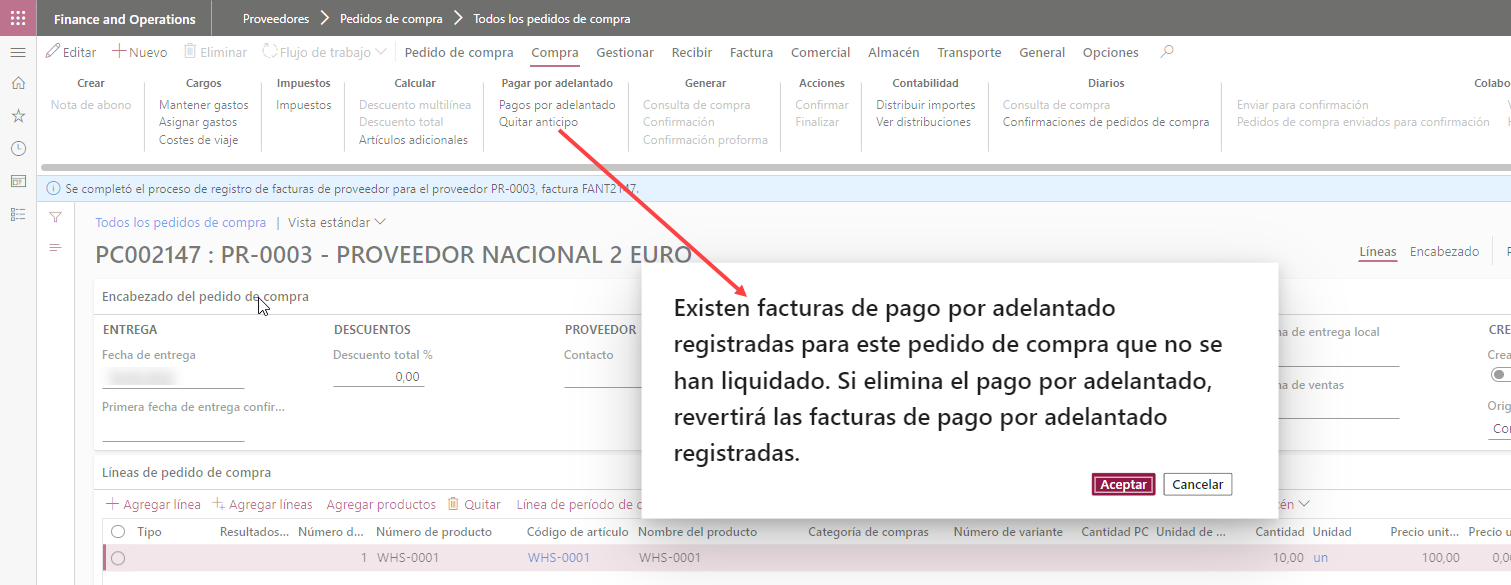
Here it is essential to note that once we settle the advance through a payment journal, this menu option Remove advances is no longer available.
Finally, if we find ourselves in the case that despite having settled the prepayment, we need to make the credit/refund of the vendor prepayment, we can choose to create a purchase order and use the same Procurement category of prepayment as an item in the purchase order line.
Then we’ll fill in the necessary information in relation to the credit invoice:
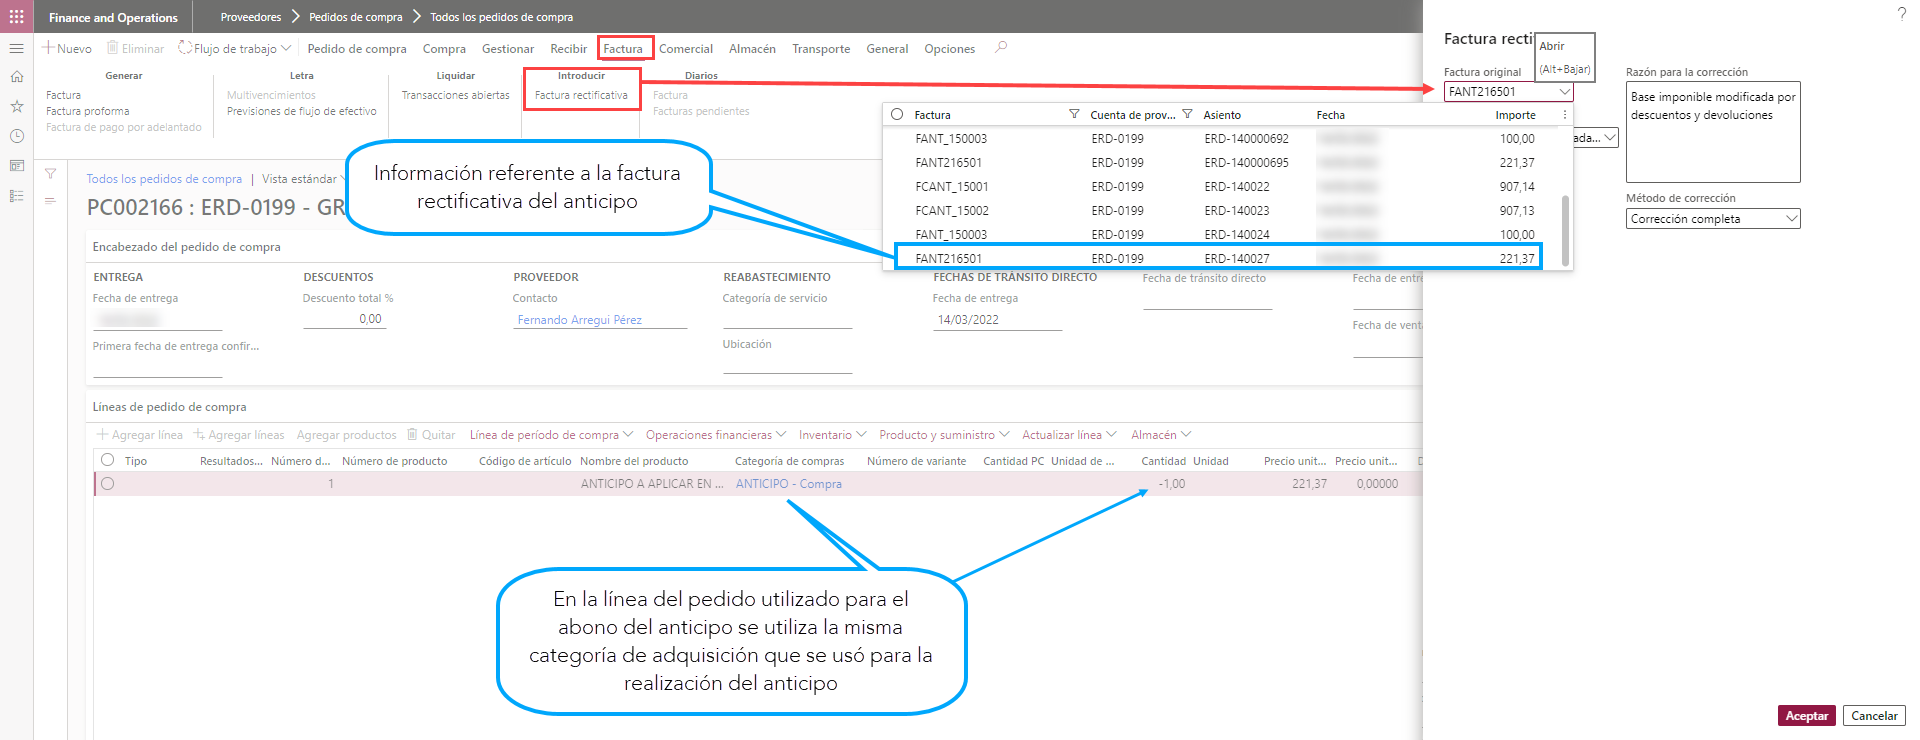
After posting the purchase order invoice for the rectification/credit of the prepayment, we will have an open transaction in our favor which we can settle by the various available means (vendor payment journals, against other open transactions, via clearing of balances with customer accounts, etc.).
Given the great ease with which we can carry out this process, as well as the traceability it offers us when it comes to tracking the reasons and origin of these prepaid amounts, we invite you to try out this functionality and explore all its possibilities.


